
Summary
Follow the instructions below to use Unifi to configure a Ubiquiti switch for Just Add Power AV over IP
These instructions are compatible with:
- Omega Series firmware B2.1.0 and later
- Ultra Series firmware B2.1.0 and later
- MaxColor Series firmware MAX v3.8.5 and later
After the Ubiquiti switch is setup, run AMP Alternate to setup Just Add Power devices and finalize the AV over IP system.
Compatible Switches
Open Unifi OS Server 4.6.3.1 (or Dream Machine equivalent). All configuration is applied through this interface.
The nature of Ubiquiti means that these instructions should work for any Ubiquiti switch that meets the Multicast Switching Requirements and is setup with Unifi.
Multicast Setup Instructions
Perform these steps BEFORE connecting any Just Add Power devices to the switch. AV traffic is VERY GOOD at crashing an unconfigured network.
Part 1: Create a VLAN & Configure IGMP Settings
-
Open Unifi Network Application (or Dream Machine equivalent). All configuration is applied through this interface.
-
Connect the Ubiquiti switch to the network, and Adopt the switch to add it to the network through the usual Unifi process.
-
Create a VLAN for Just Add Power devices:
-
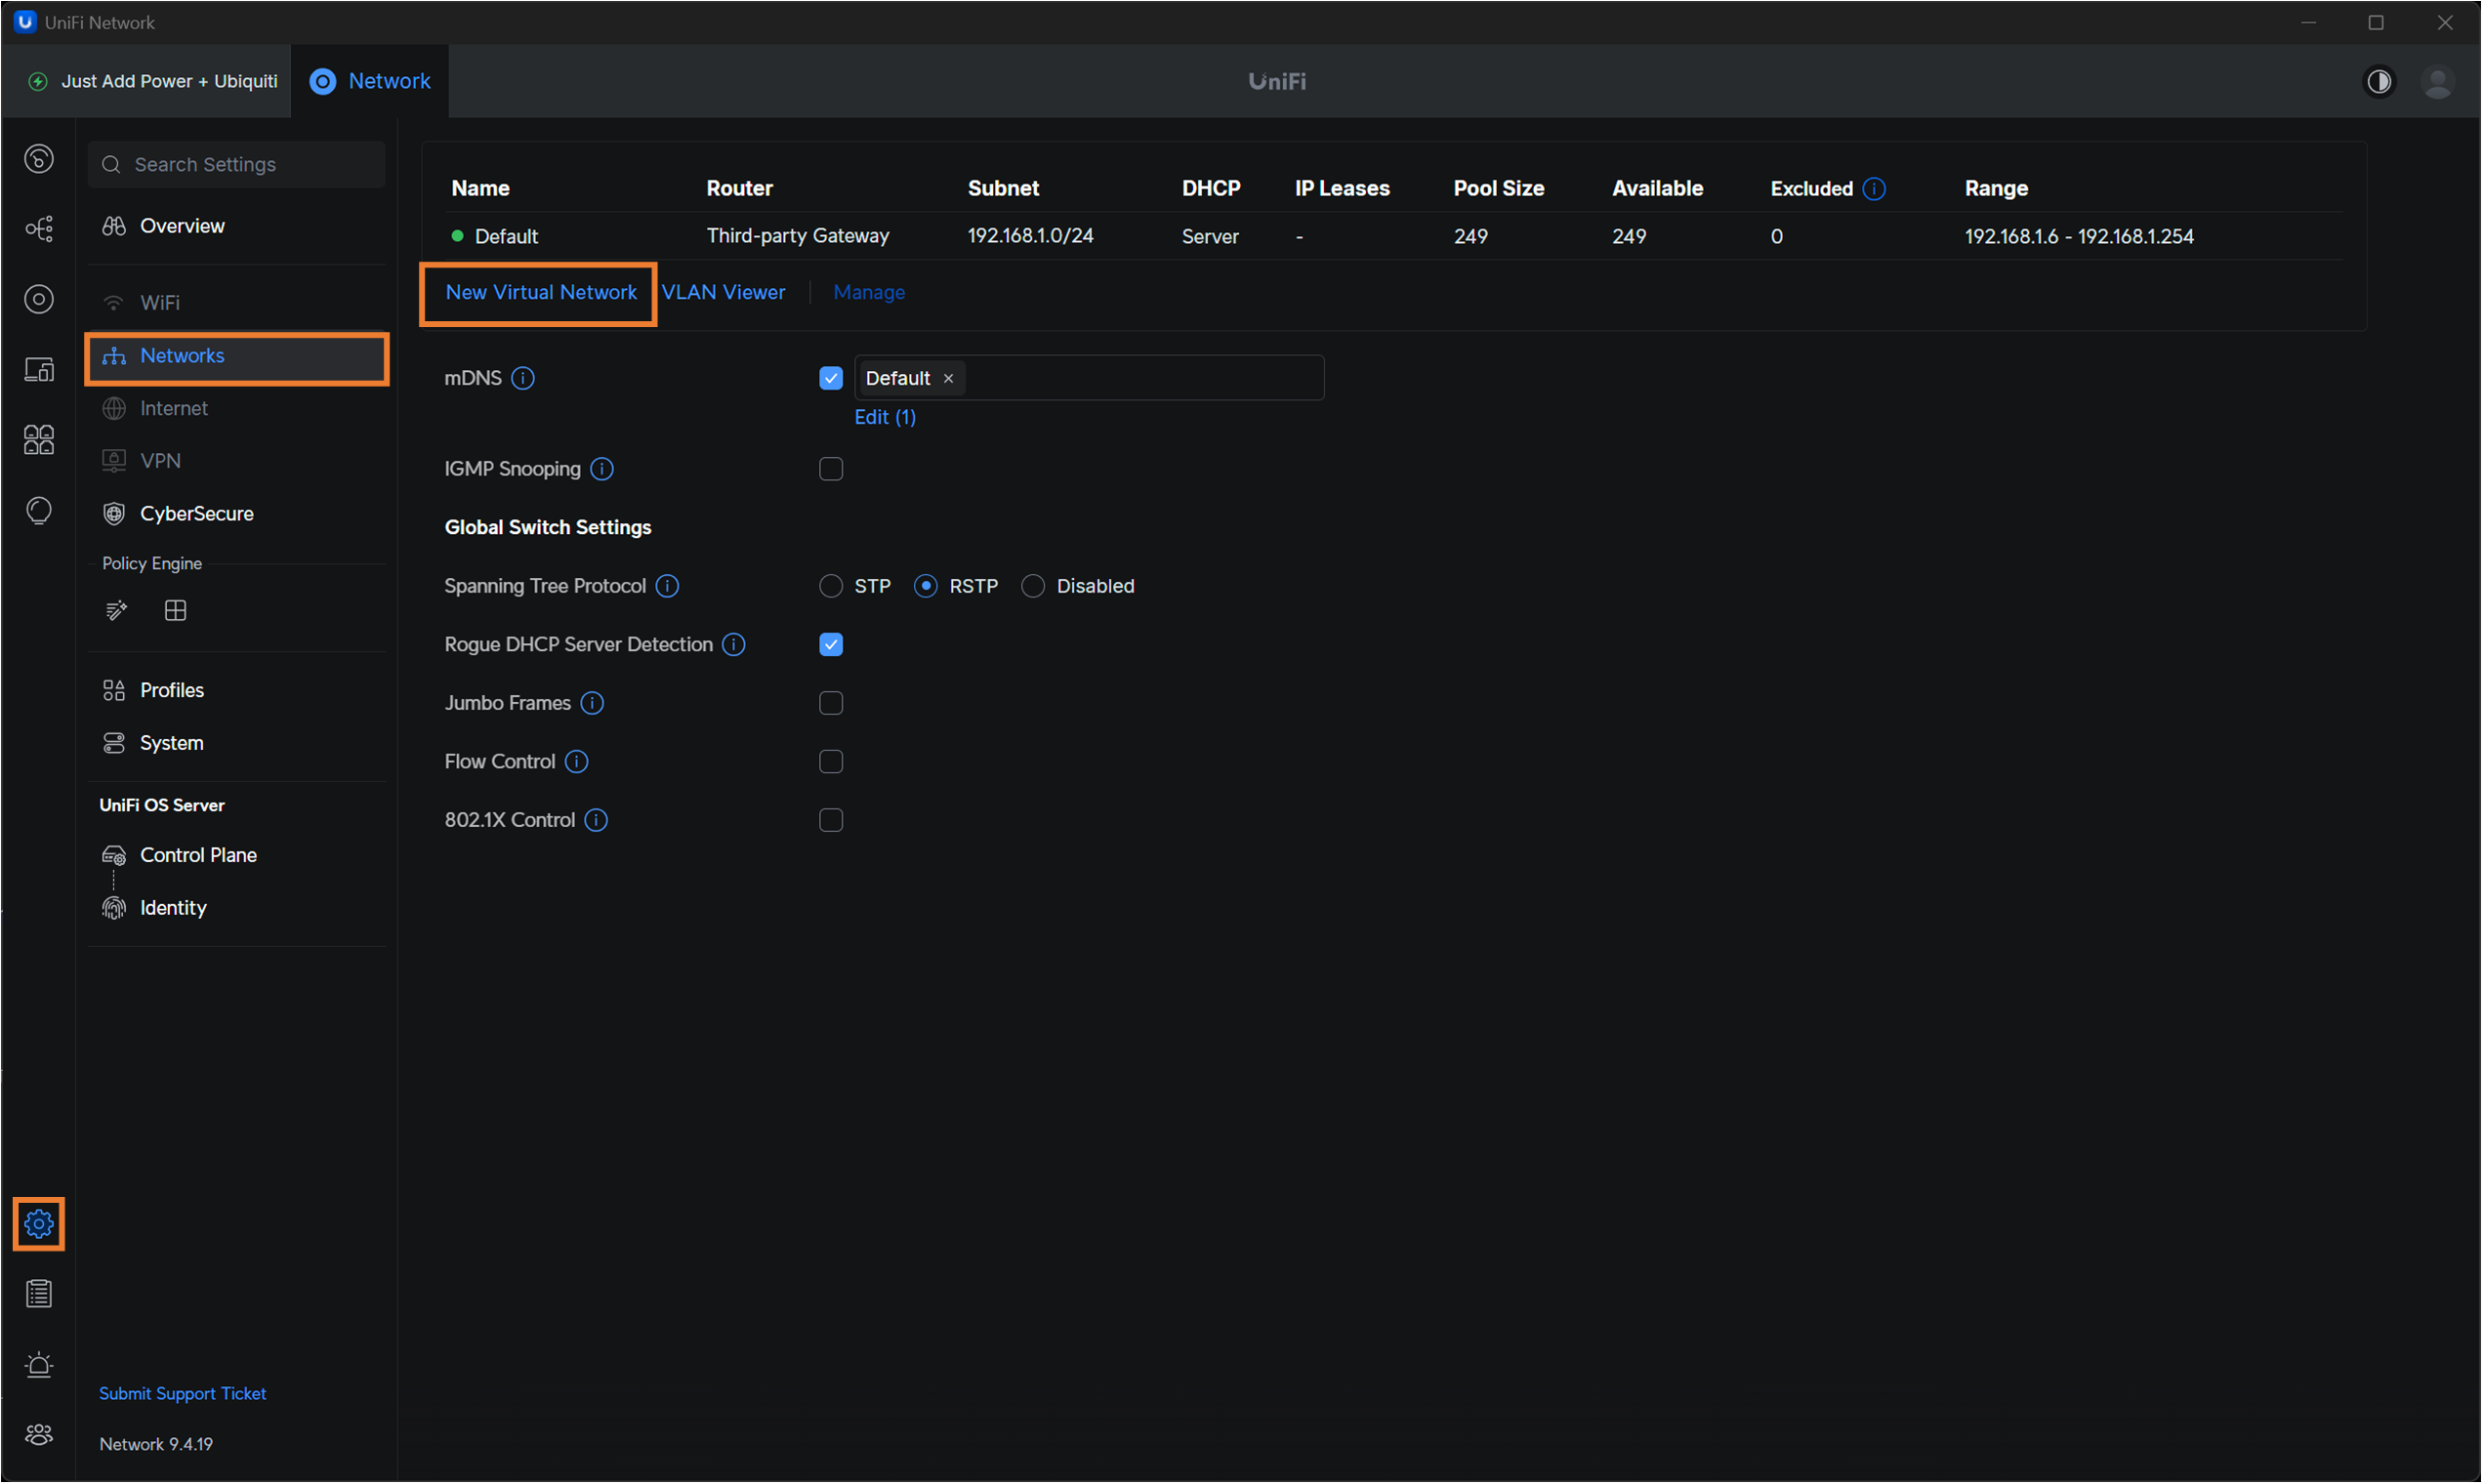
On the left tab, select Settings --> Networks and then select New Virtual Network.
-
-
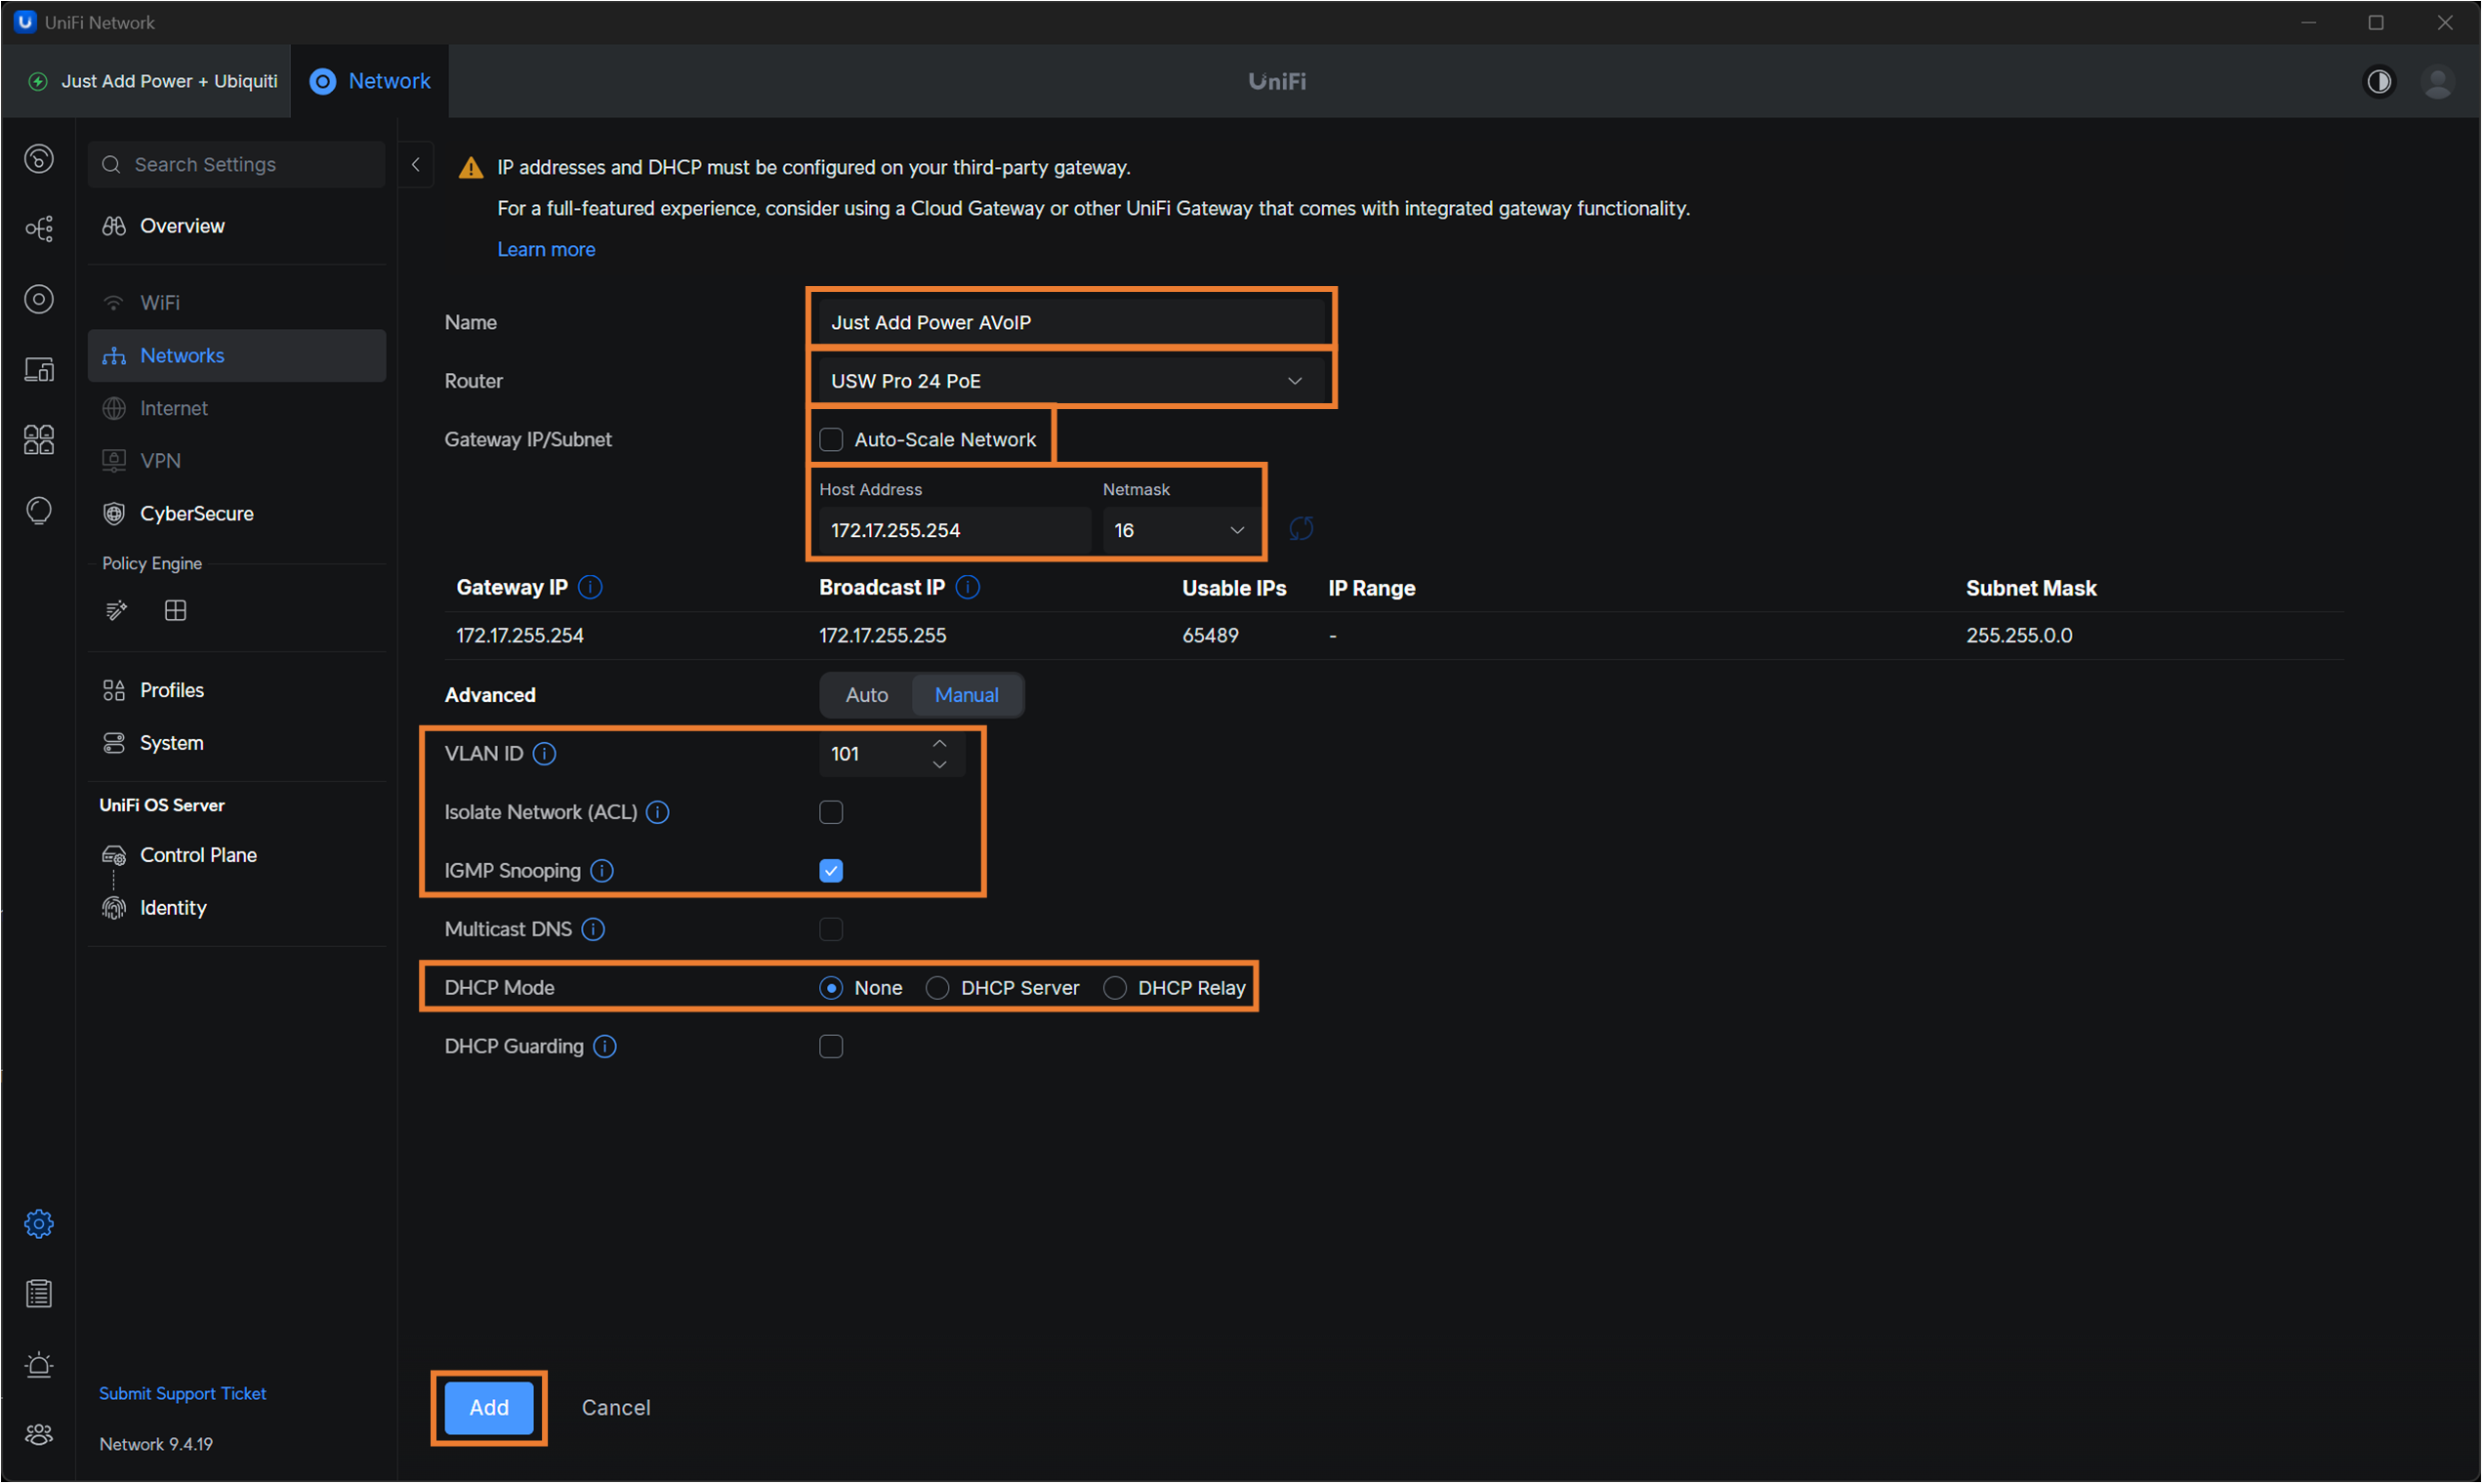
Apply these settings to the new Virtual Network:
-
Name = Just Add Power AVoIP (or another user-friendly name for you to remember what the VLAN is for.)
-
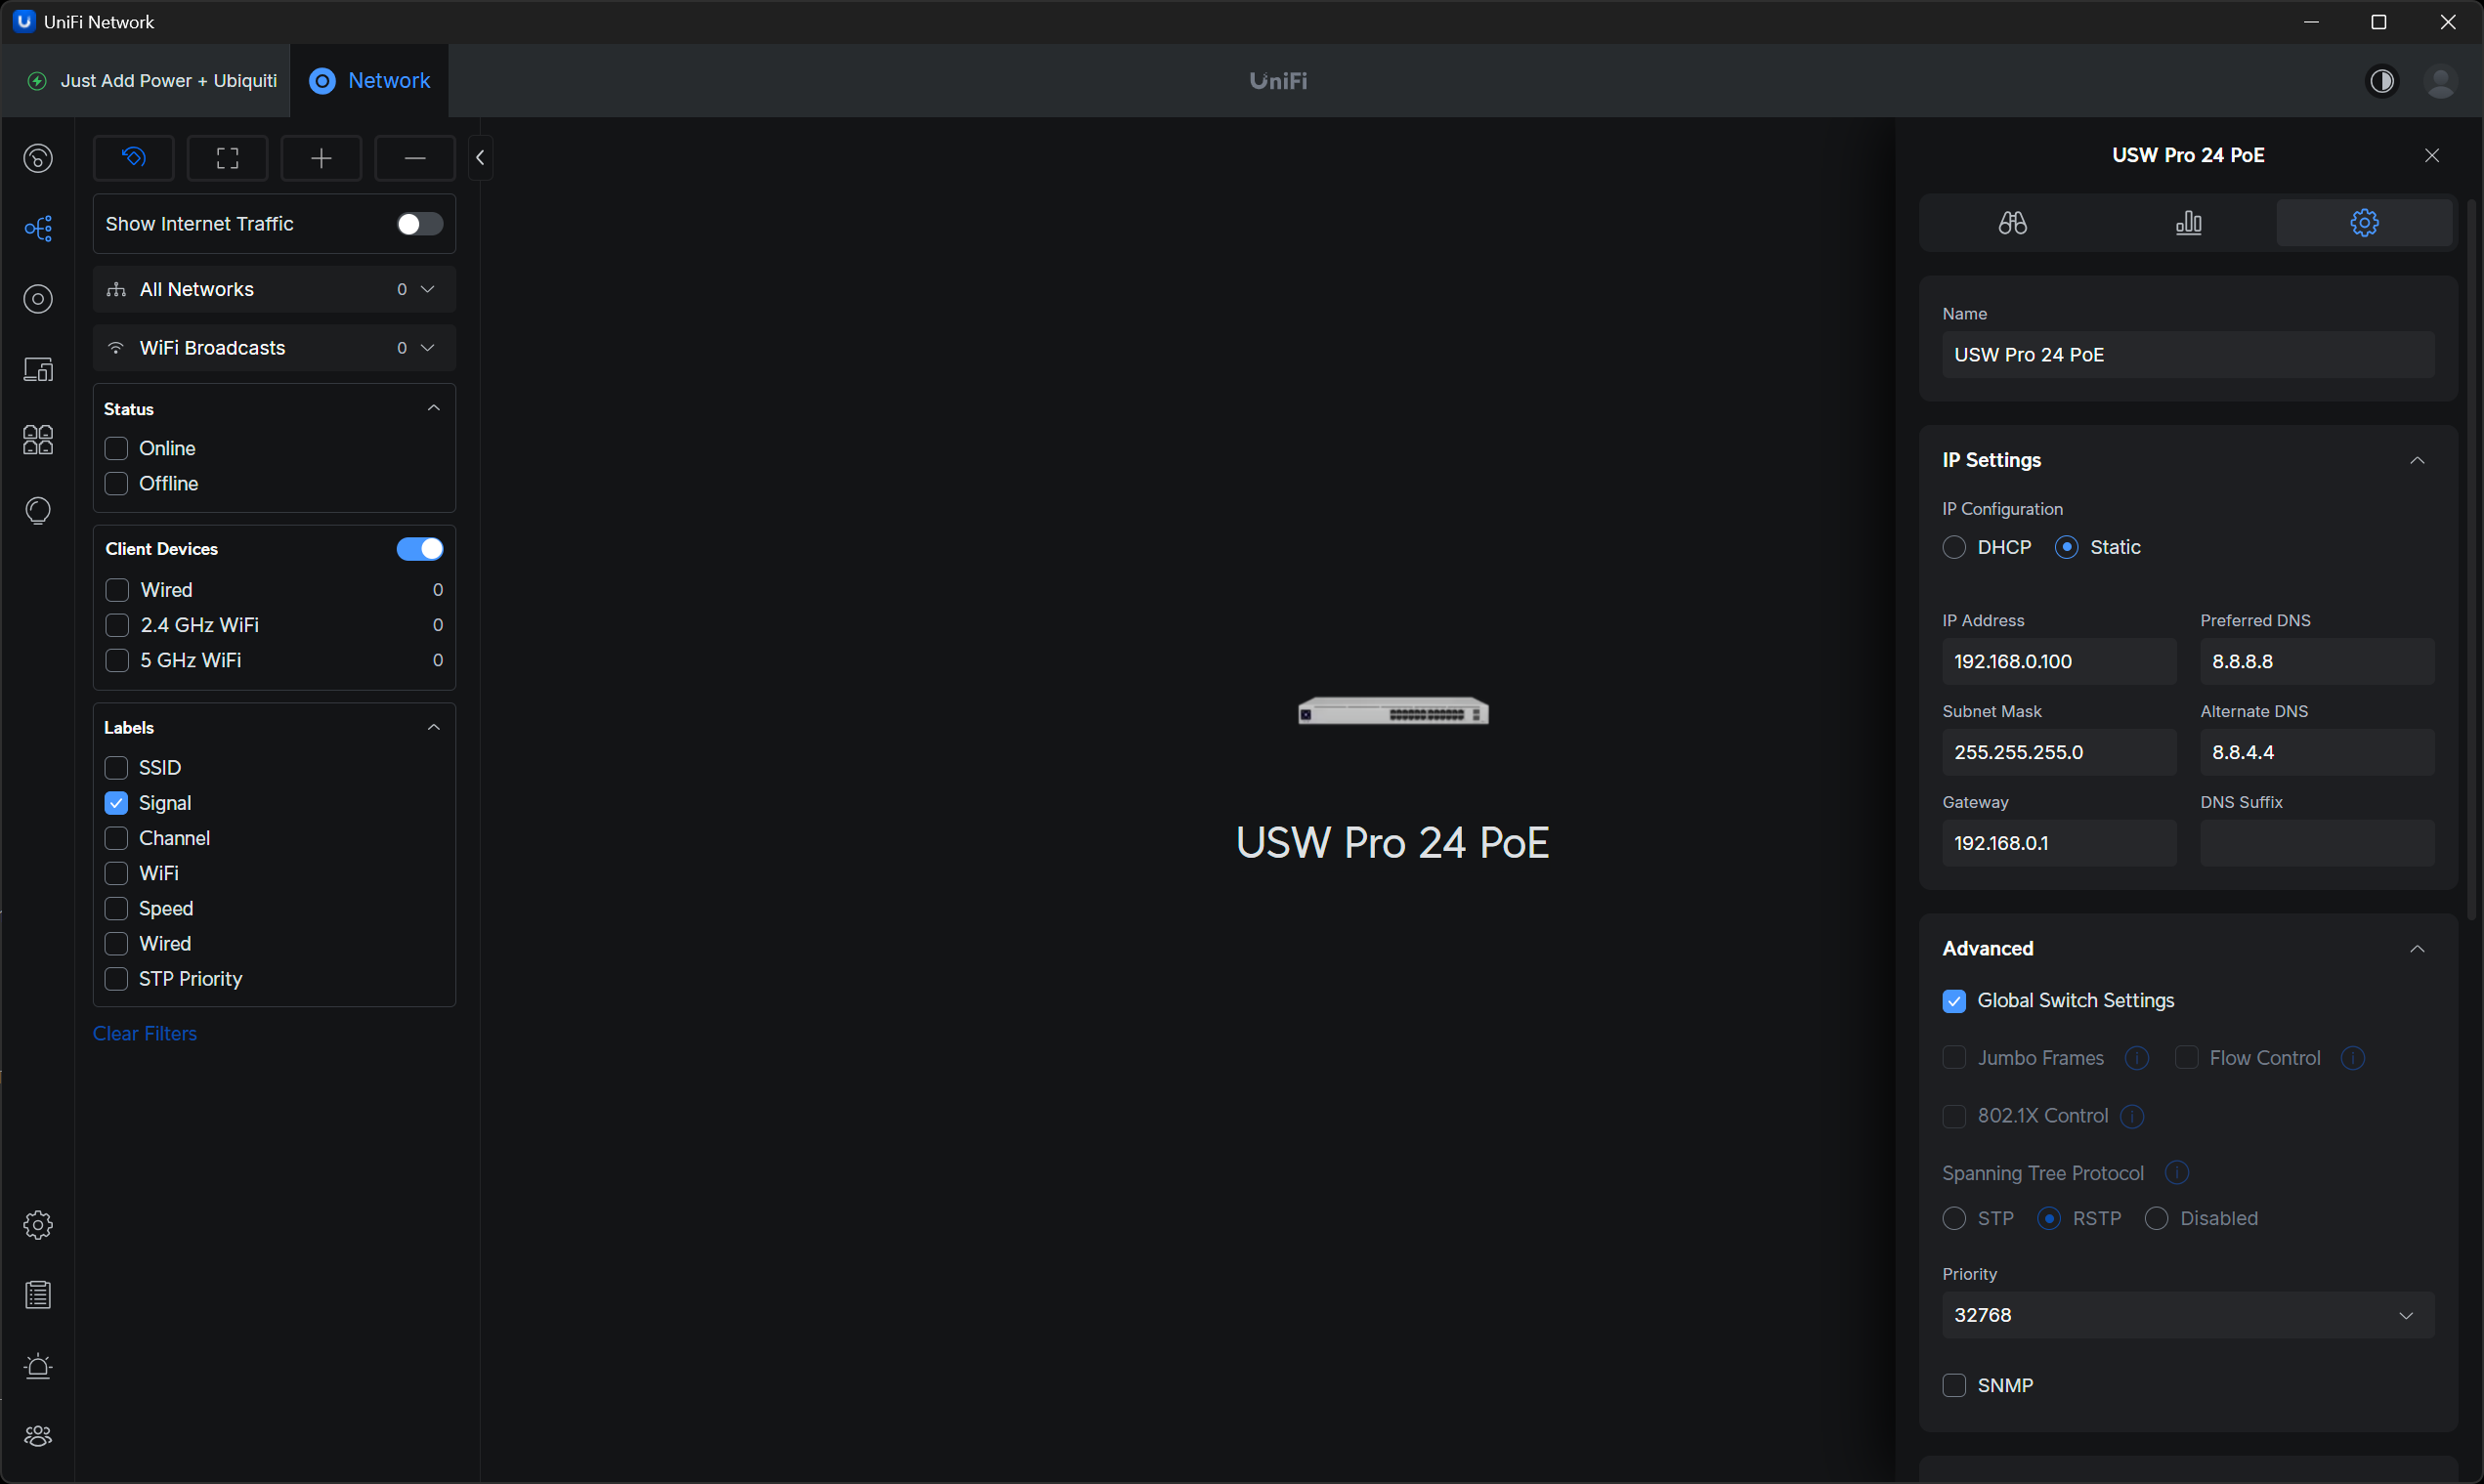
Router = USW Pro 24 POE (the switch the devices are connected to.)
-
Uncheck Auto-Scale Network.
-
Host Address = 172.17.255.254 (This is the default set by AMP Alternate. You may use any value you want, but this value MUST match the Default Gateway of all Just Add Power devices.)
-
Network = 16 (This is the default set by AMP Alternate. You may use any value you want, but this value MUST match the Subnet Mask of all Just Add Power devices.)
-
VLAN ID = 101 (This field assigns a group number for the Virtual Network, as an identifier. As along as all Just Add Power ports on the switch share the same VLAN ID, they will work together.)
-
Uncheck Isolate Network (ACL)
-
Check IGMP Snooping
-
Set DHCP Mode to None (AMP will assign IP addresses to the Just Add Power devices. We do NOT want the switch assigning random IPs to devices.)
-
Uncheck DHCP Guarding
-
Click Add once all settings are applied
-
-
Now that the VLAN exists, we have to enable a few additional settings for the VLAN:
-
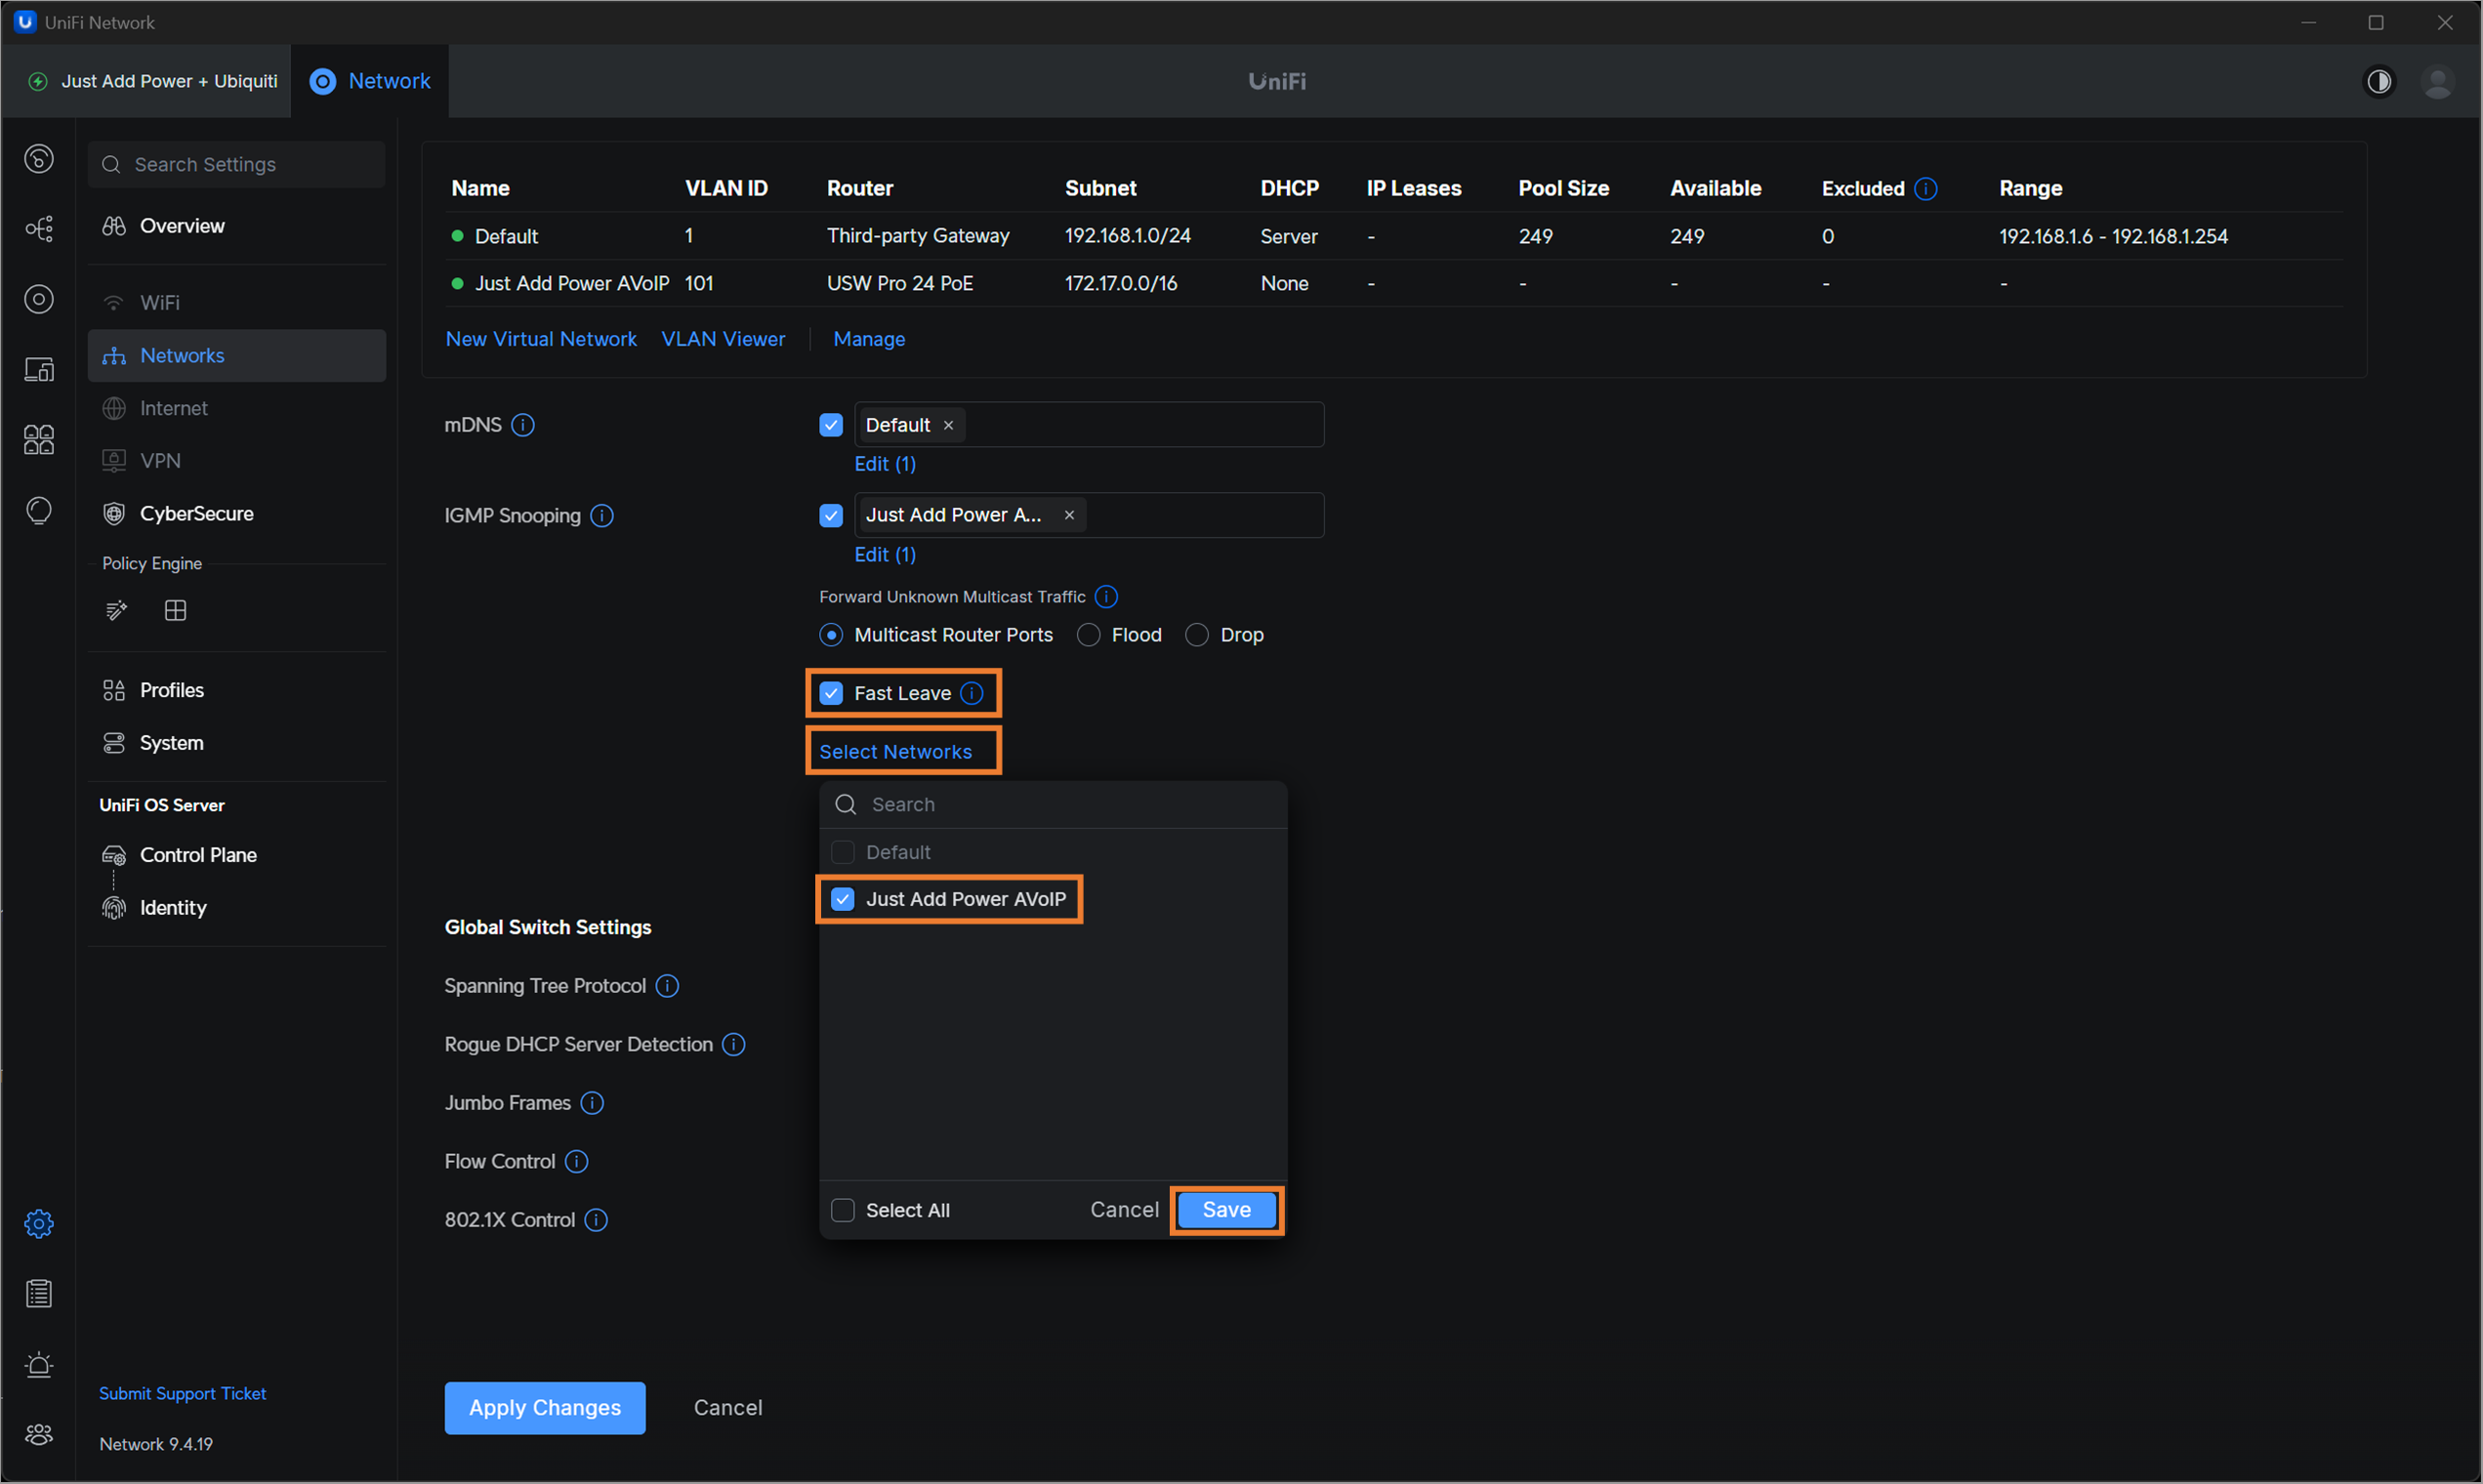
Set IGMP Snooping to be enabled on the Just Add Power AVoIP VLAN.
-
Check Fast Leave.
-
Click Select Networks
-
CheckJust Add Power AVoIP VLAN
-
Click Save
-
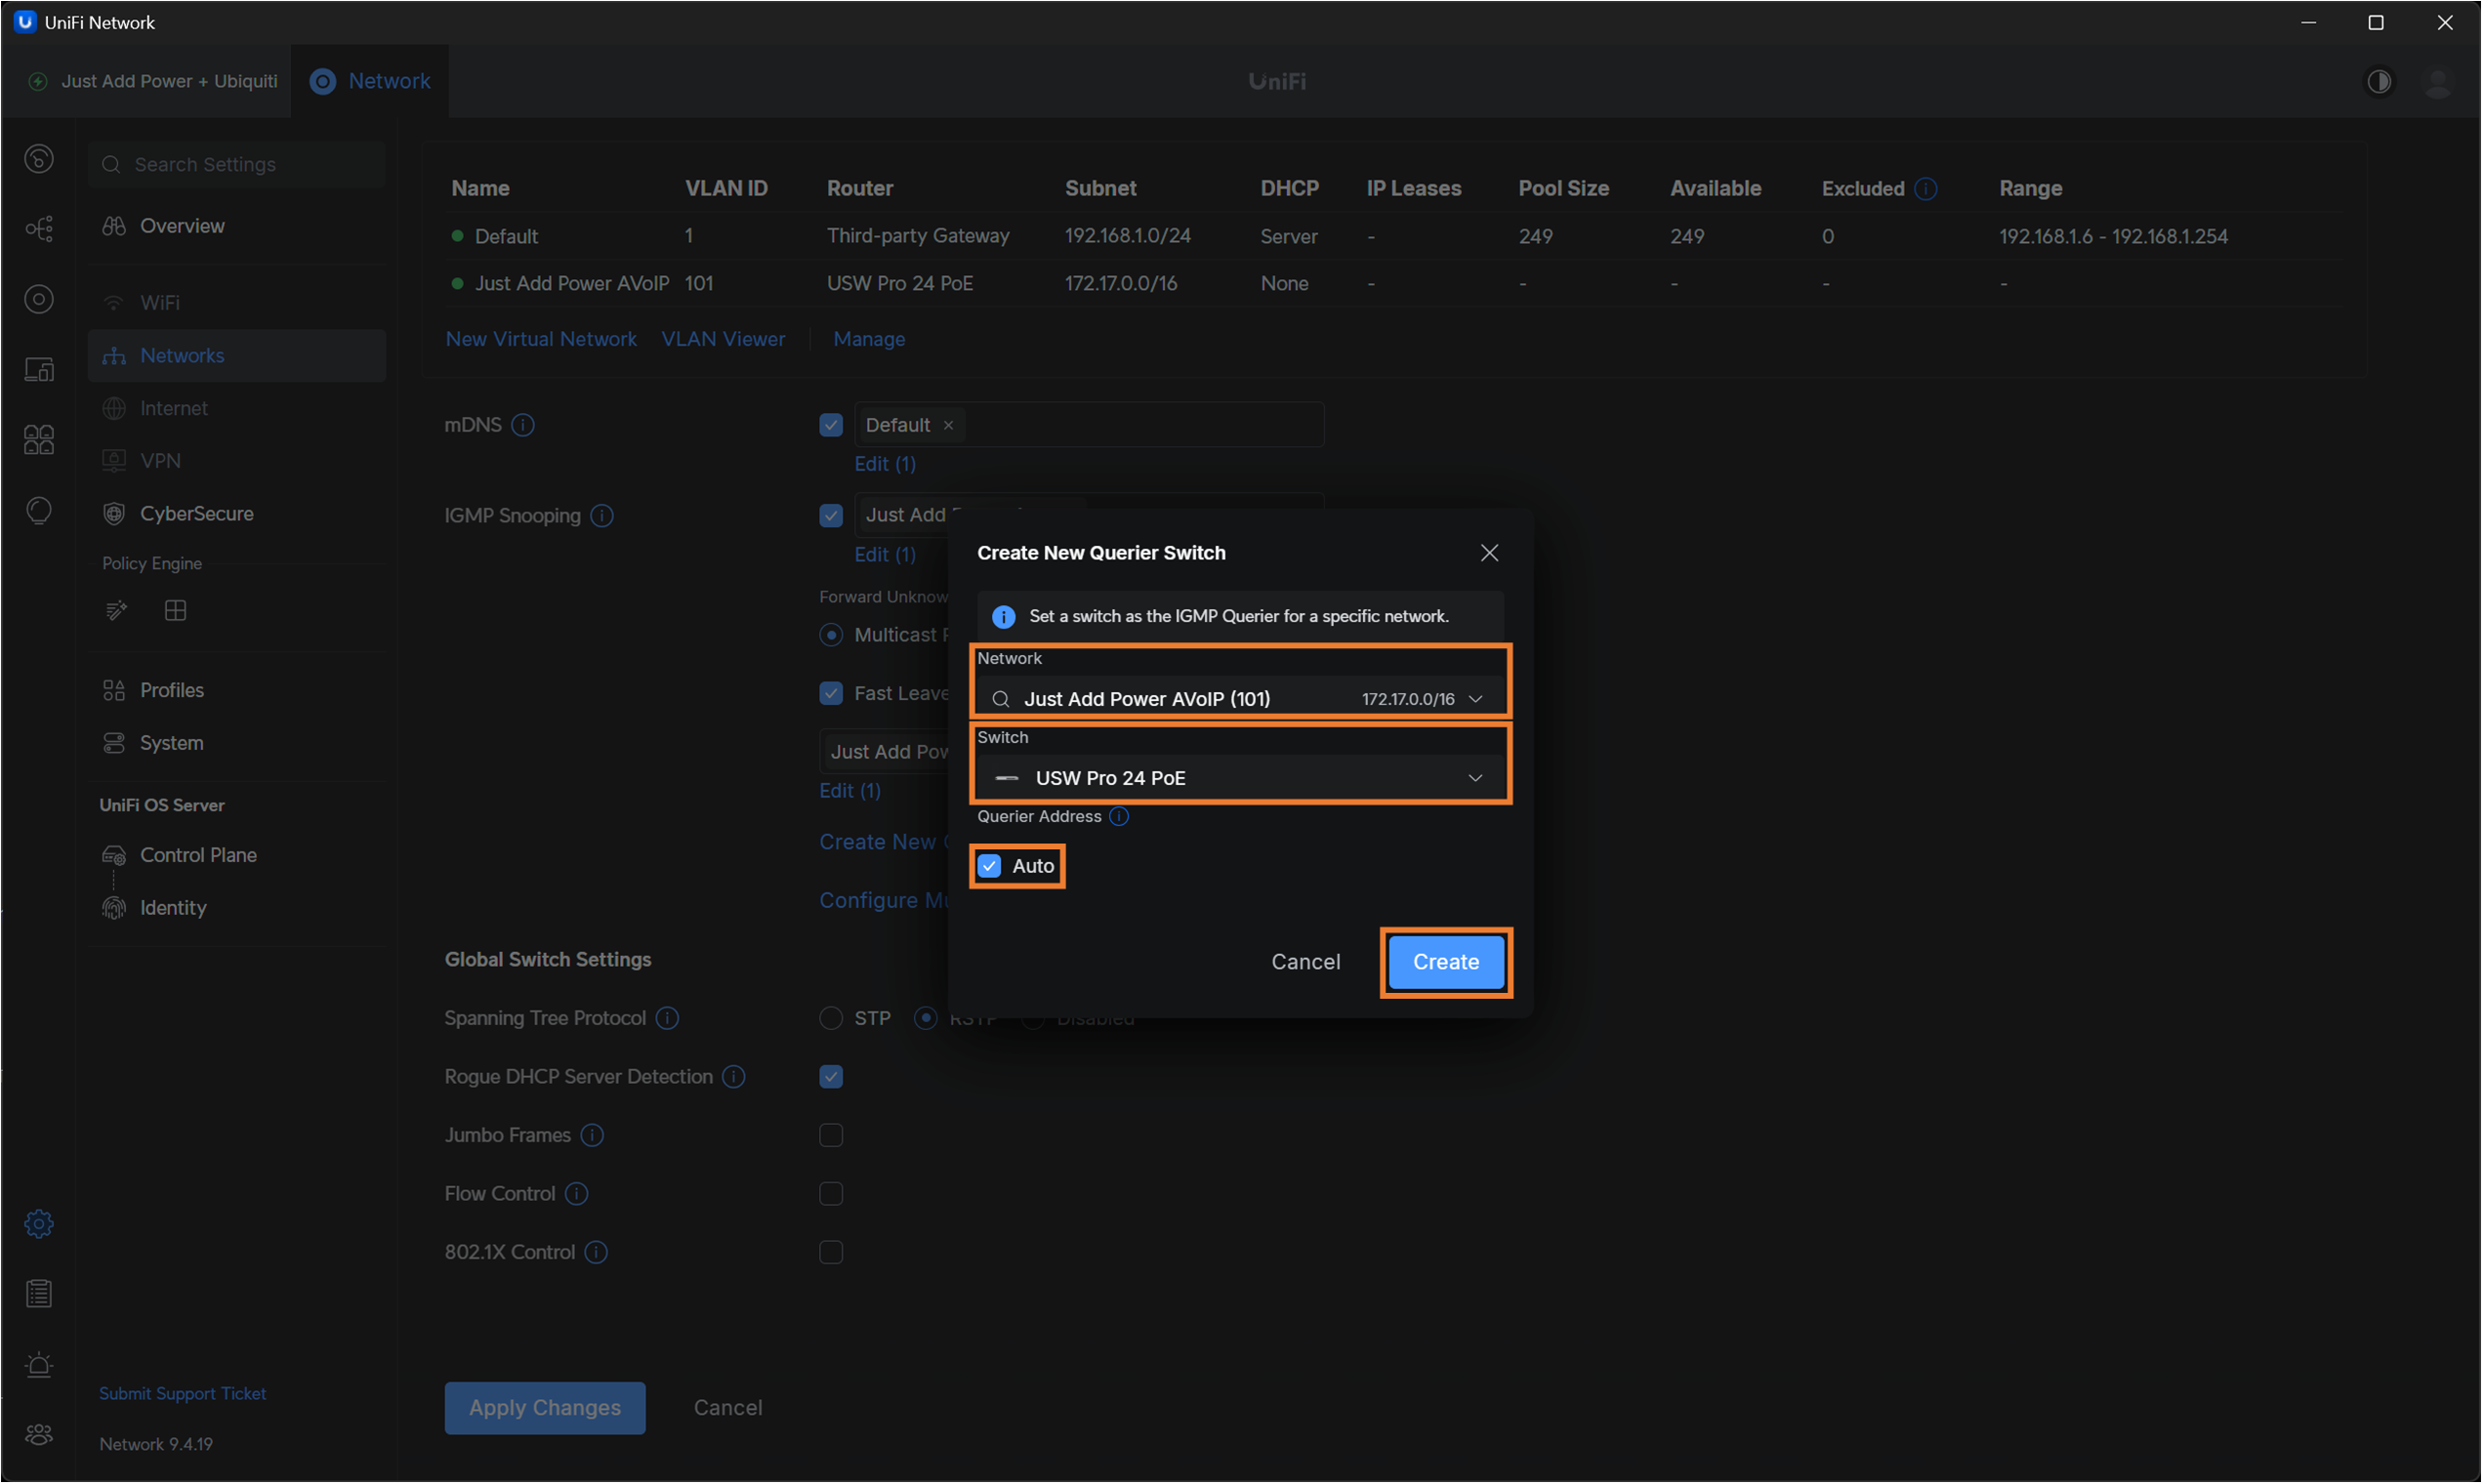
Click Create New Querier Switch. A new popup will appear.
-
Set the Network to Just Add Power AVoIP and the Switch to USB Pro 24 POE. Set Querier Address to Auto. Click Create.
-
-
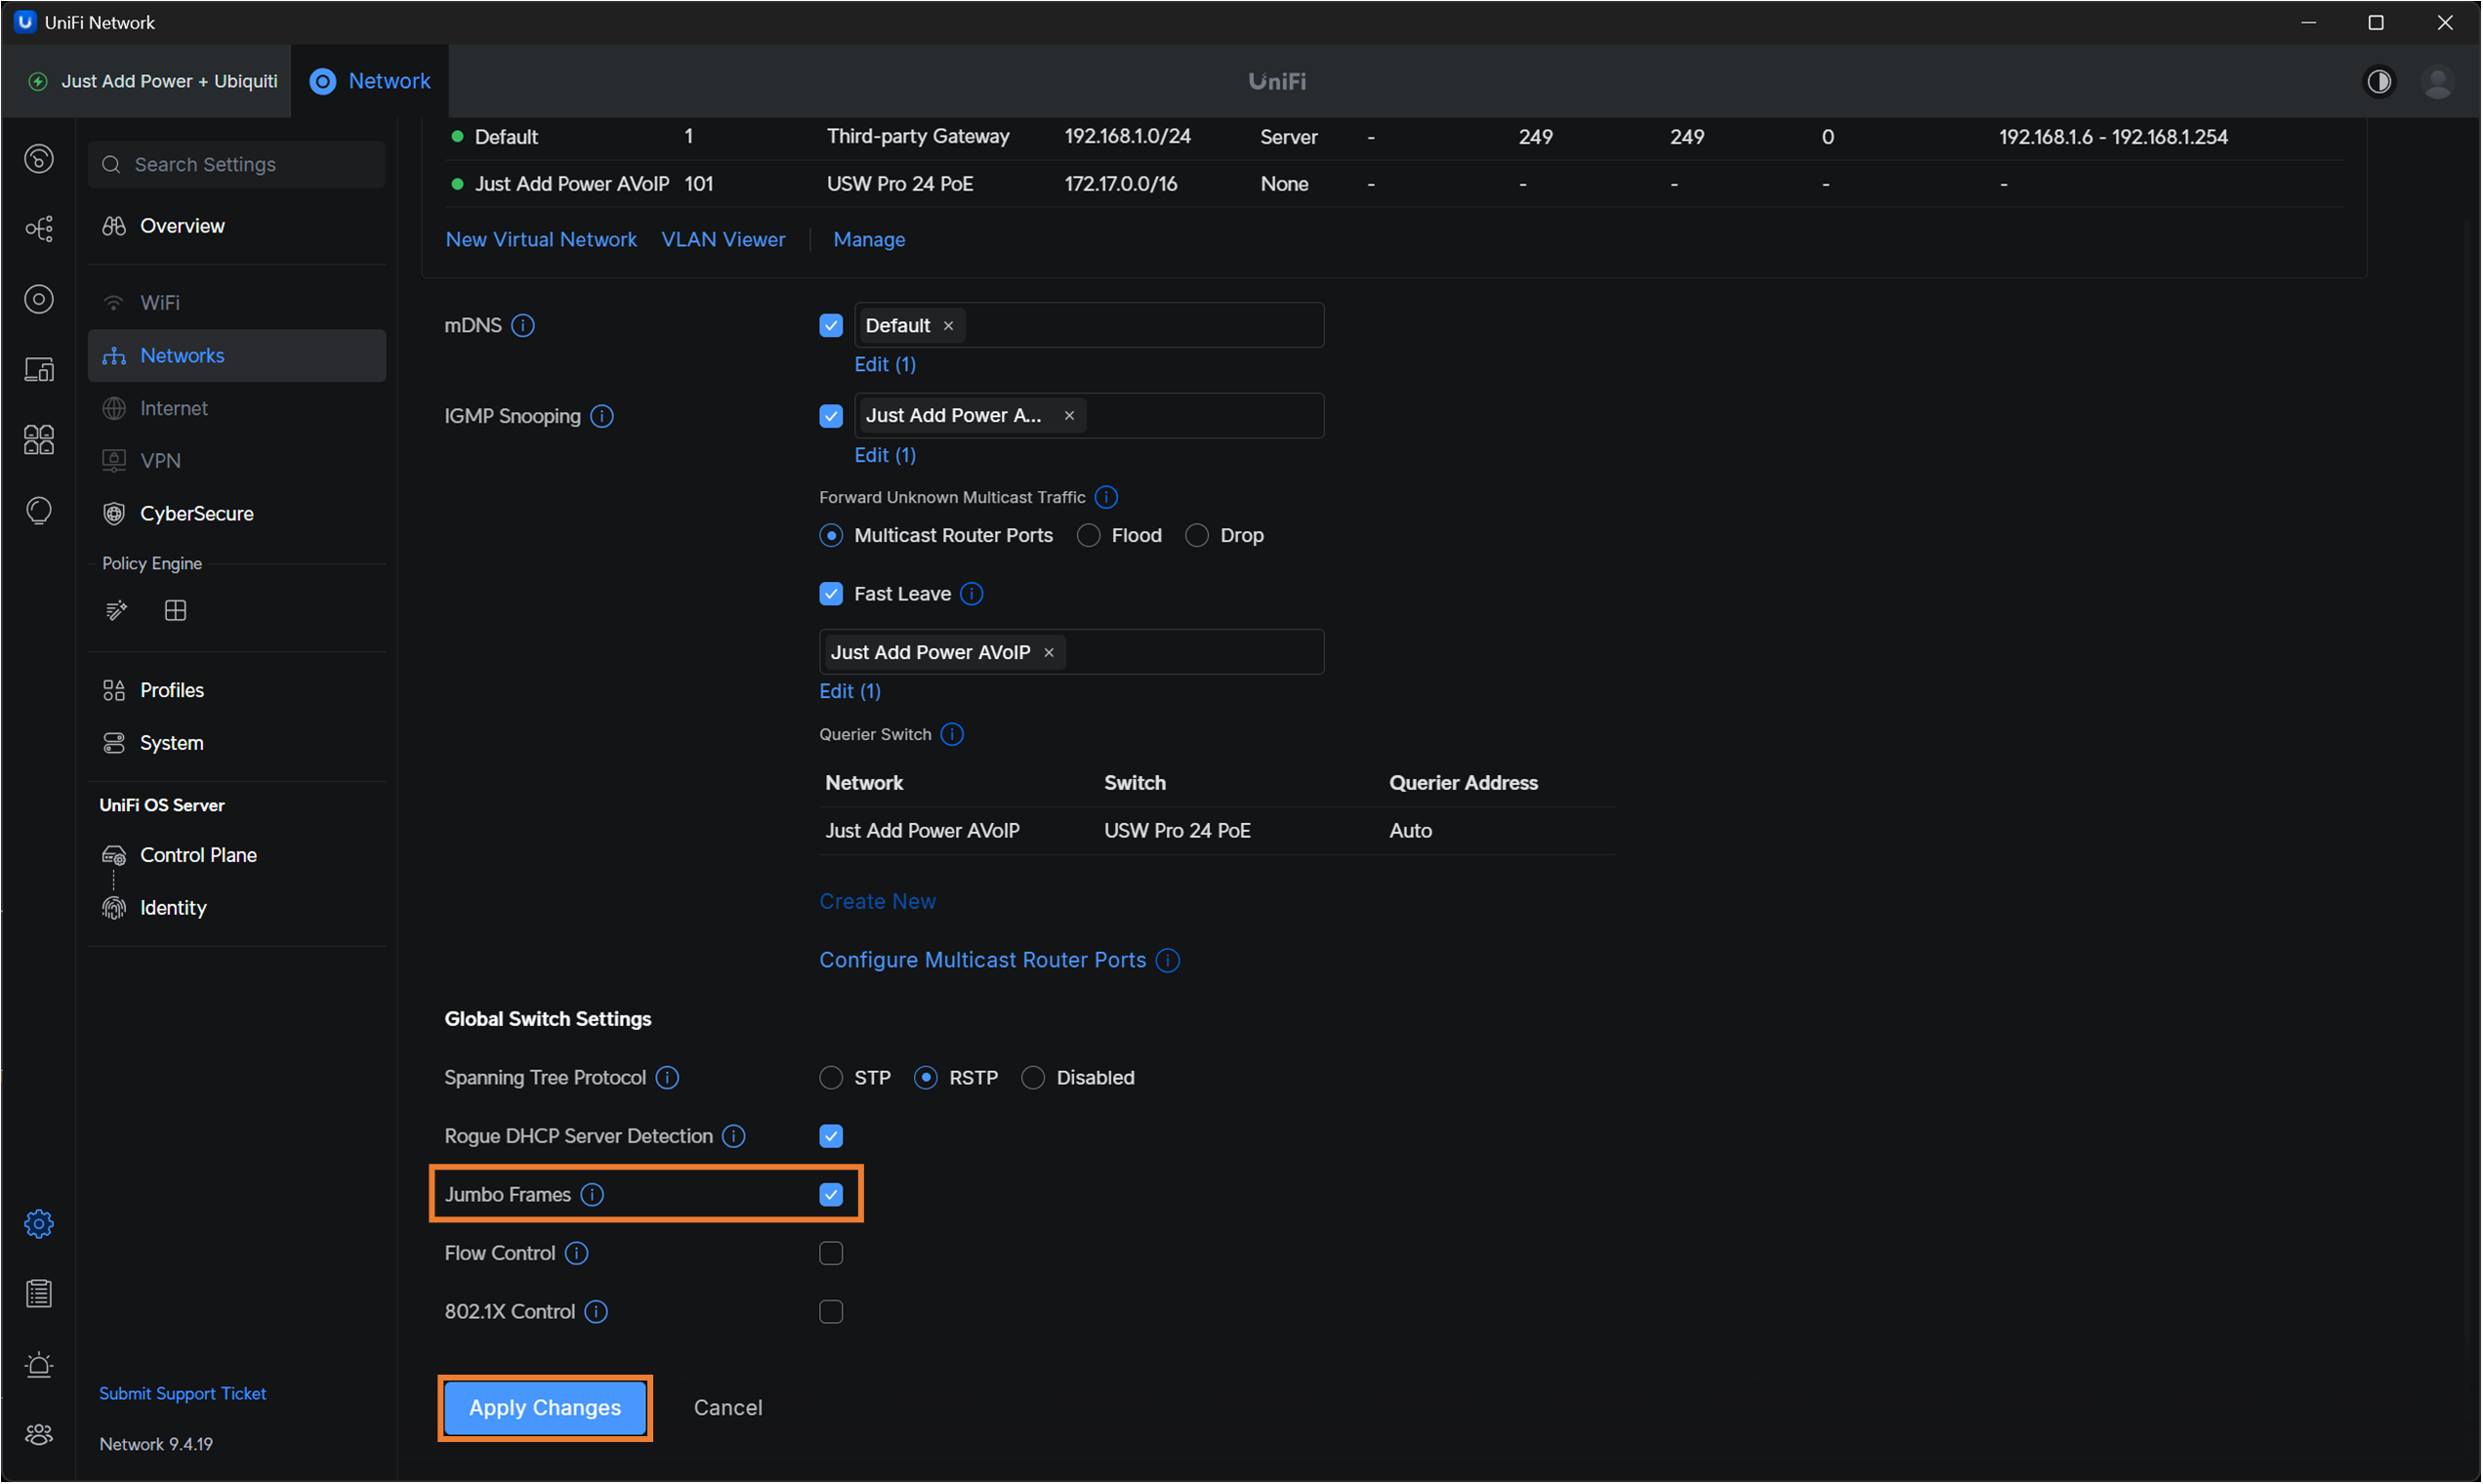
Check Jumbo Frames
-
When all settings have been entered, the screen will look like this before clicking Apply Changes.
-
-
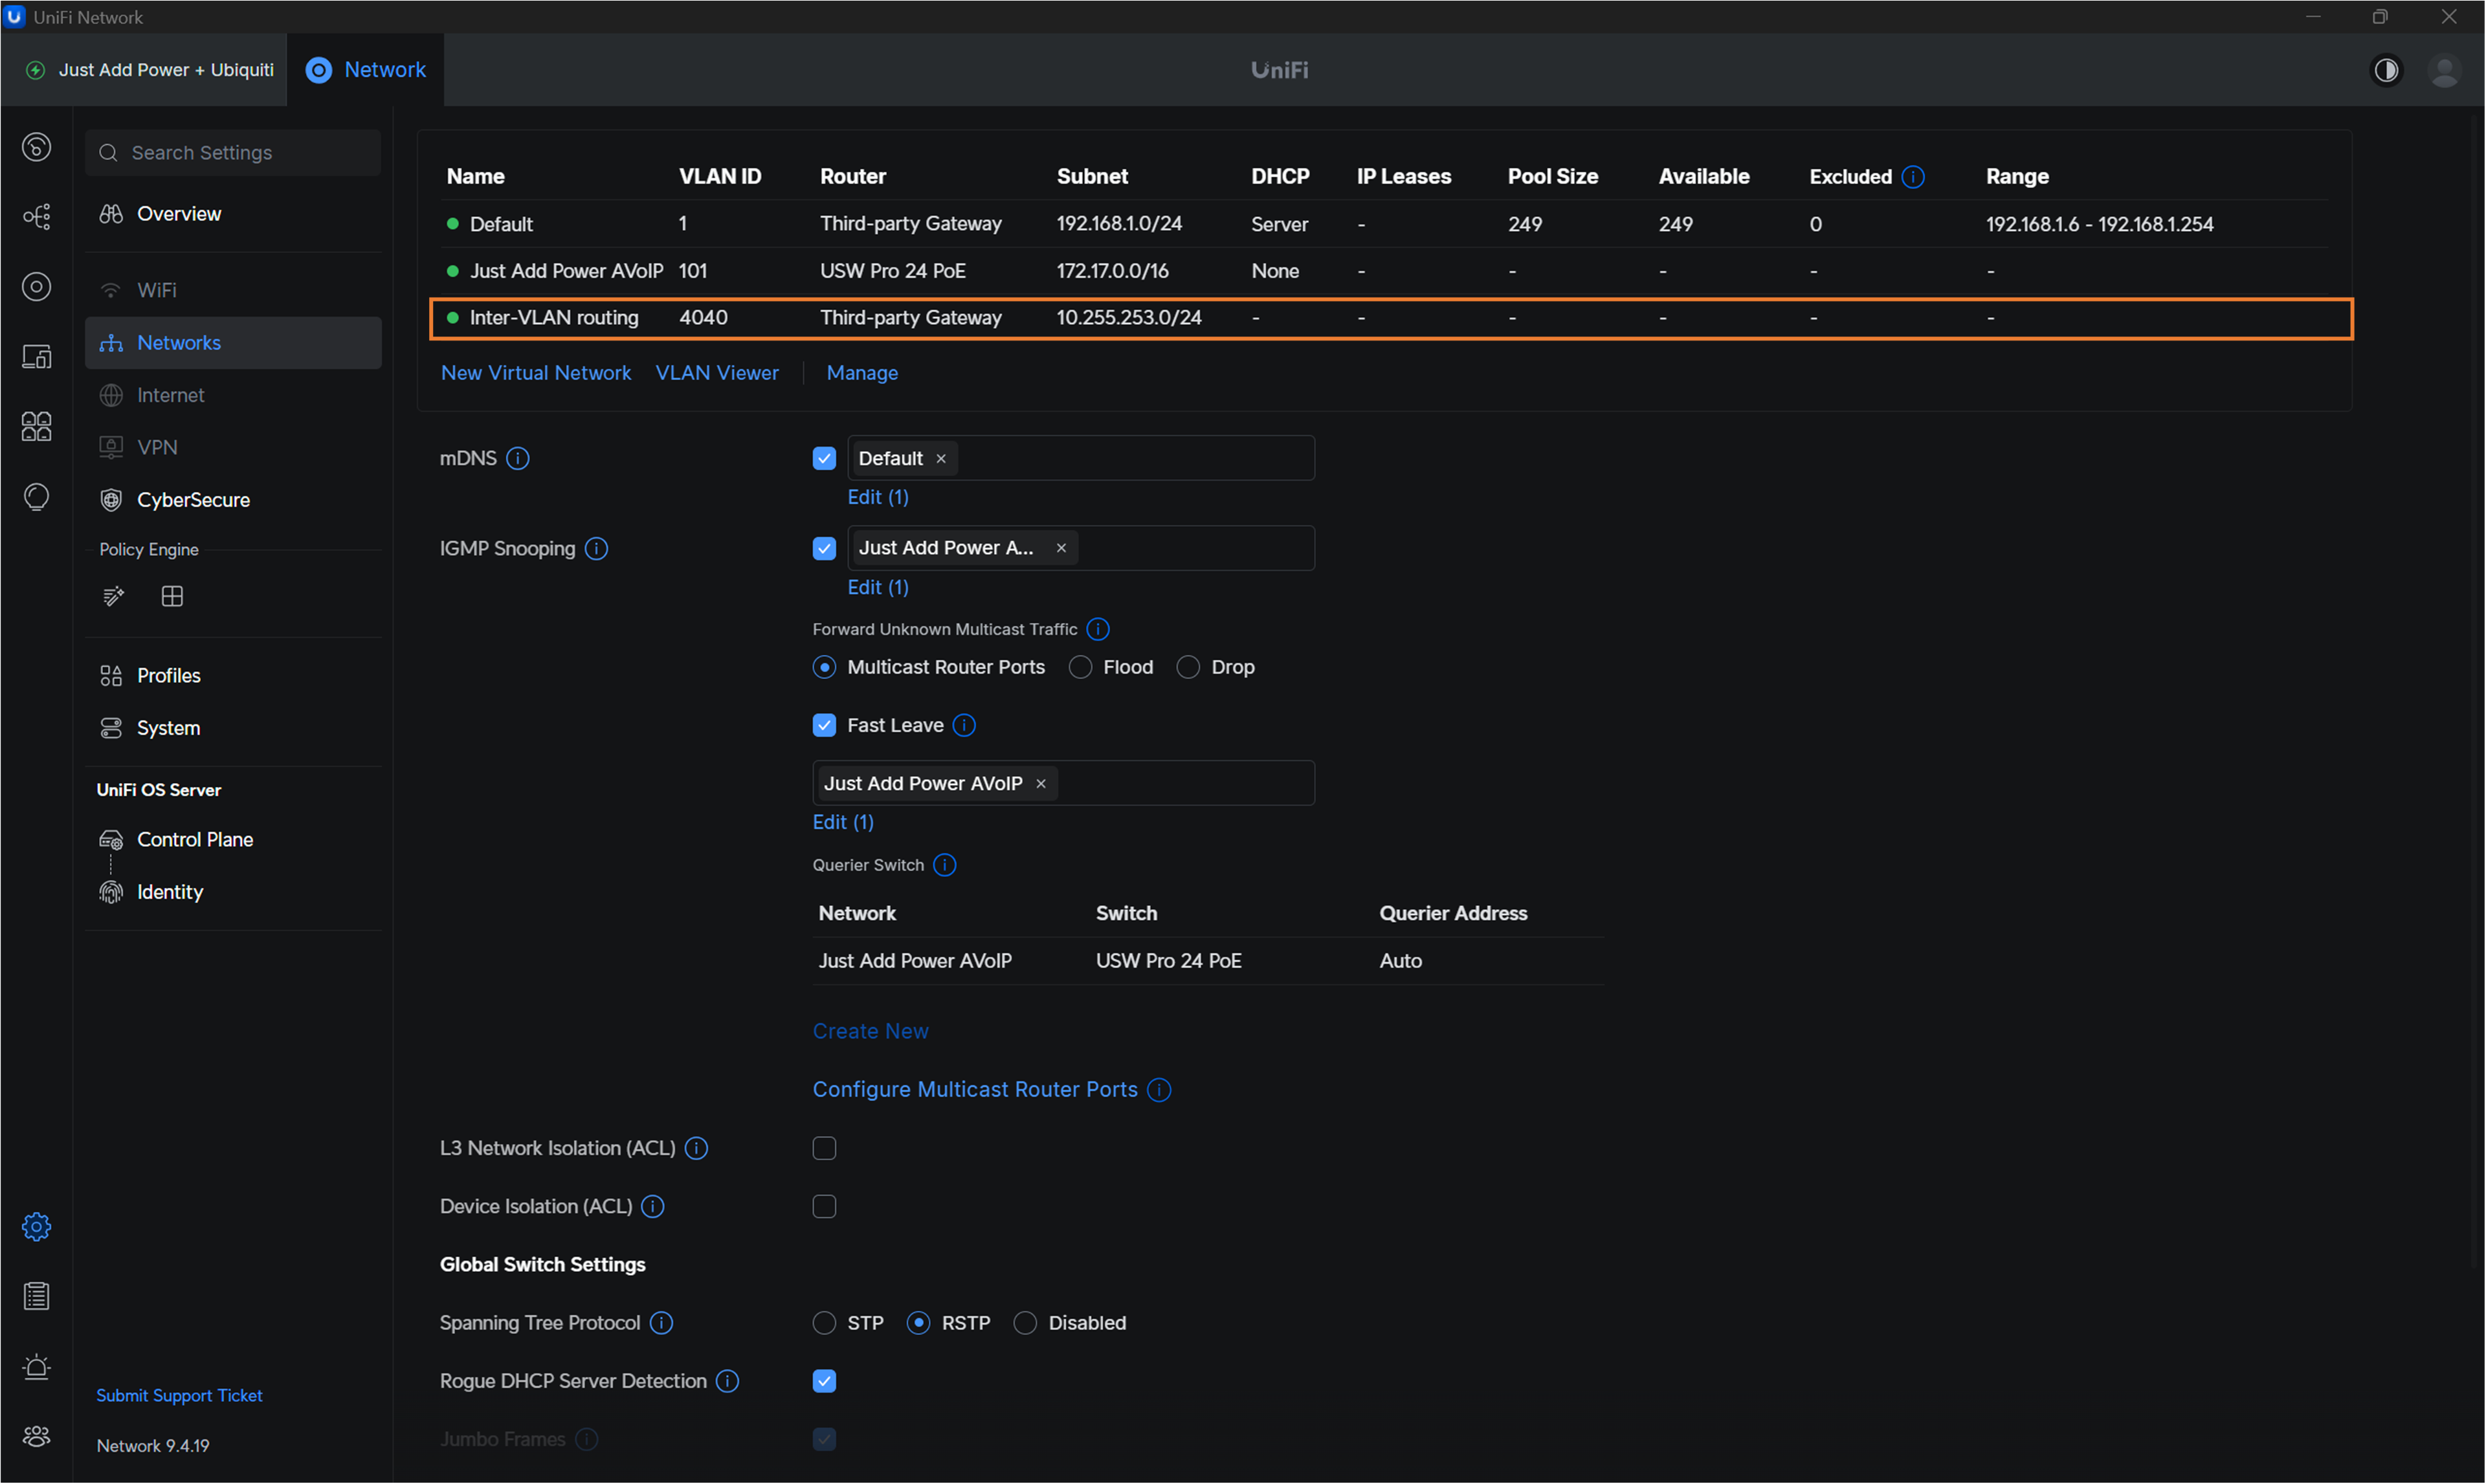
Reload the page by clicking Overview, and then back to Networks. Afterward, the Inter-VLAN routing VLAN 4040 will appear in the VLAN list. This is a good thing, as it allows devices on VLAN 1 to communicate with Just Add Power AVoIP on VLAN 101.
-
Part 1 is Complete!
-
Note: If you are using multiple Ubiquiti switches, desingate only ONE switch as the Querier.
-
Part 2: Assign Switchports to the Just Add Power AVoIP VLAN
Next assign ports on the switch to the Just Add Power AVoIP VLAN we created.
-
On the left tab, select Ports.
-
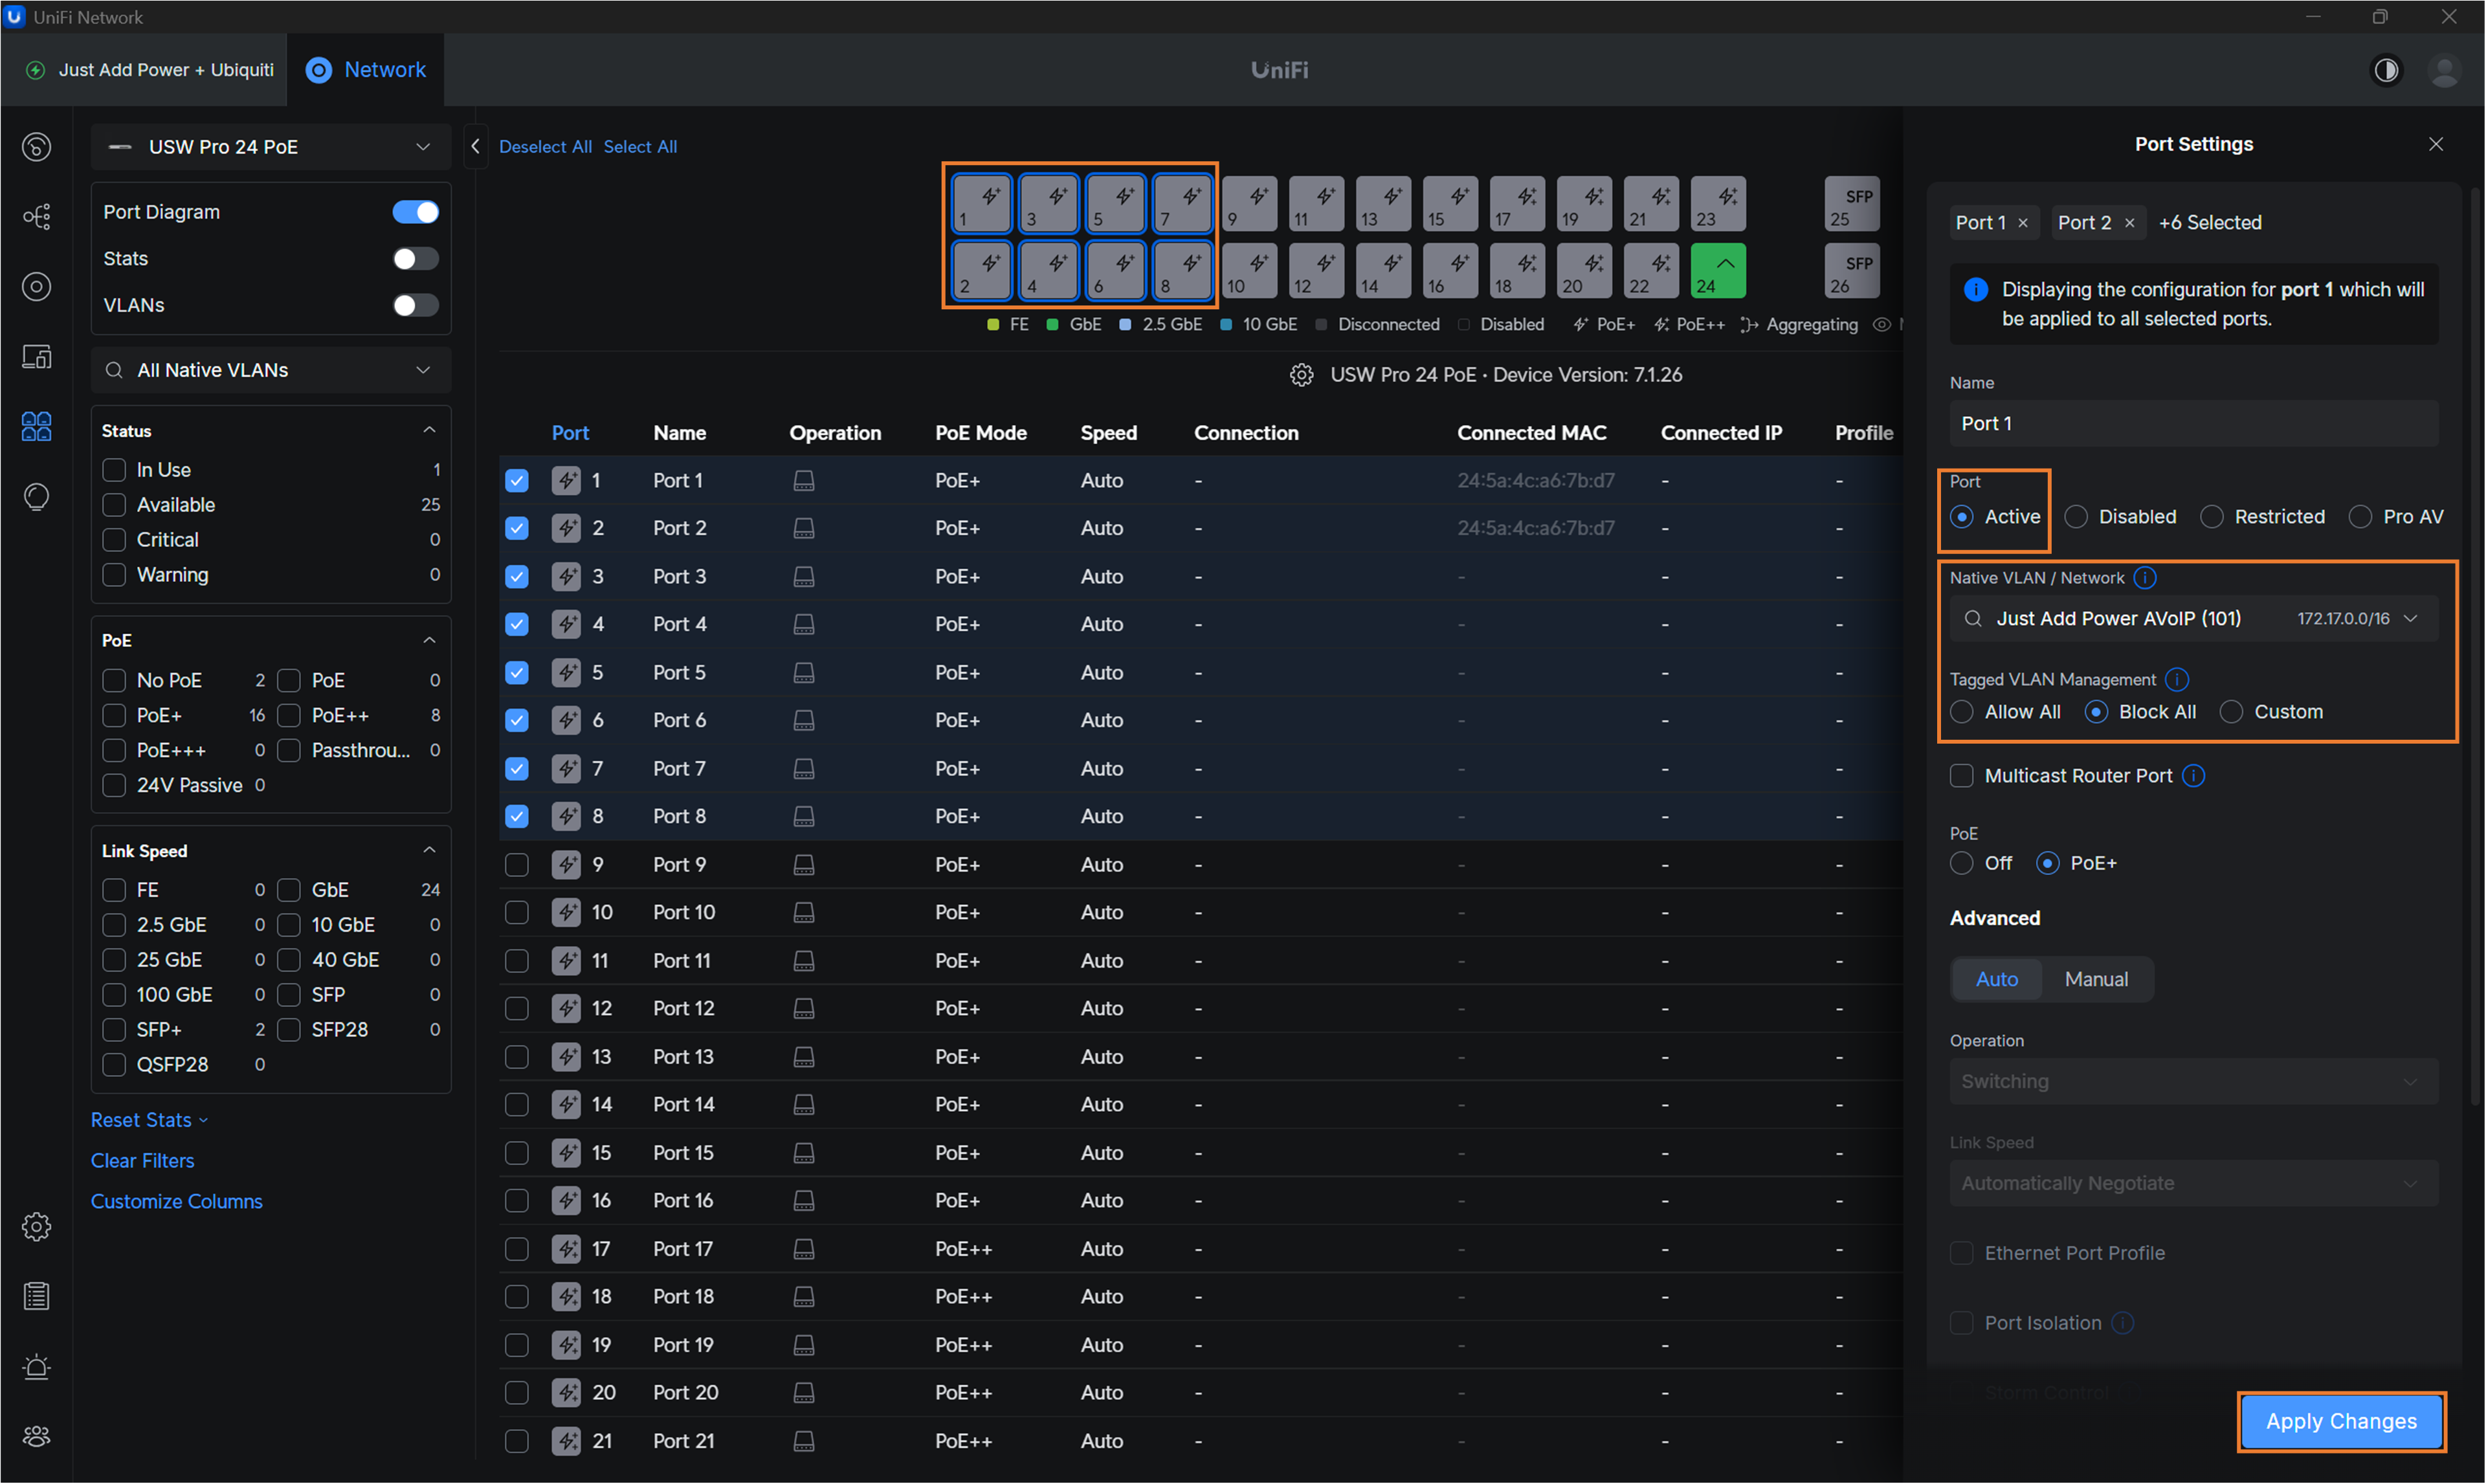
On the diagram, select the ports that will have Just Add Power devices connected to them. (In this example, we select ports 1-8. When you perform these steps yourself, devices SHOULD NOT be connected to the switch. You would select ALL ports that will hold future Just Add Power devices.)
-
In the pop-out menu on the right side:
-
Set Port to Active.
-
Set Native VLAN / Network to Just Add Power AVoIP (101).
-
Set Tagged VLAN Management to Block All.
-
Leave all other settings as they are.
-
Click Apply Changes.
-
-
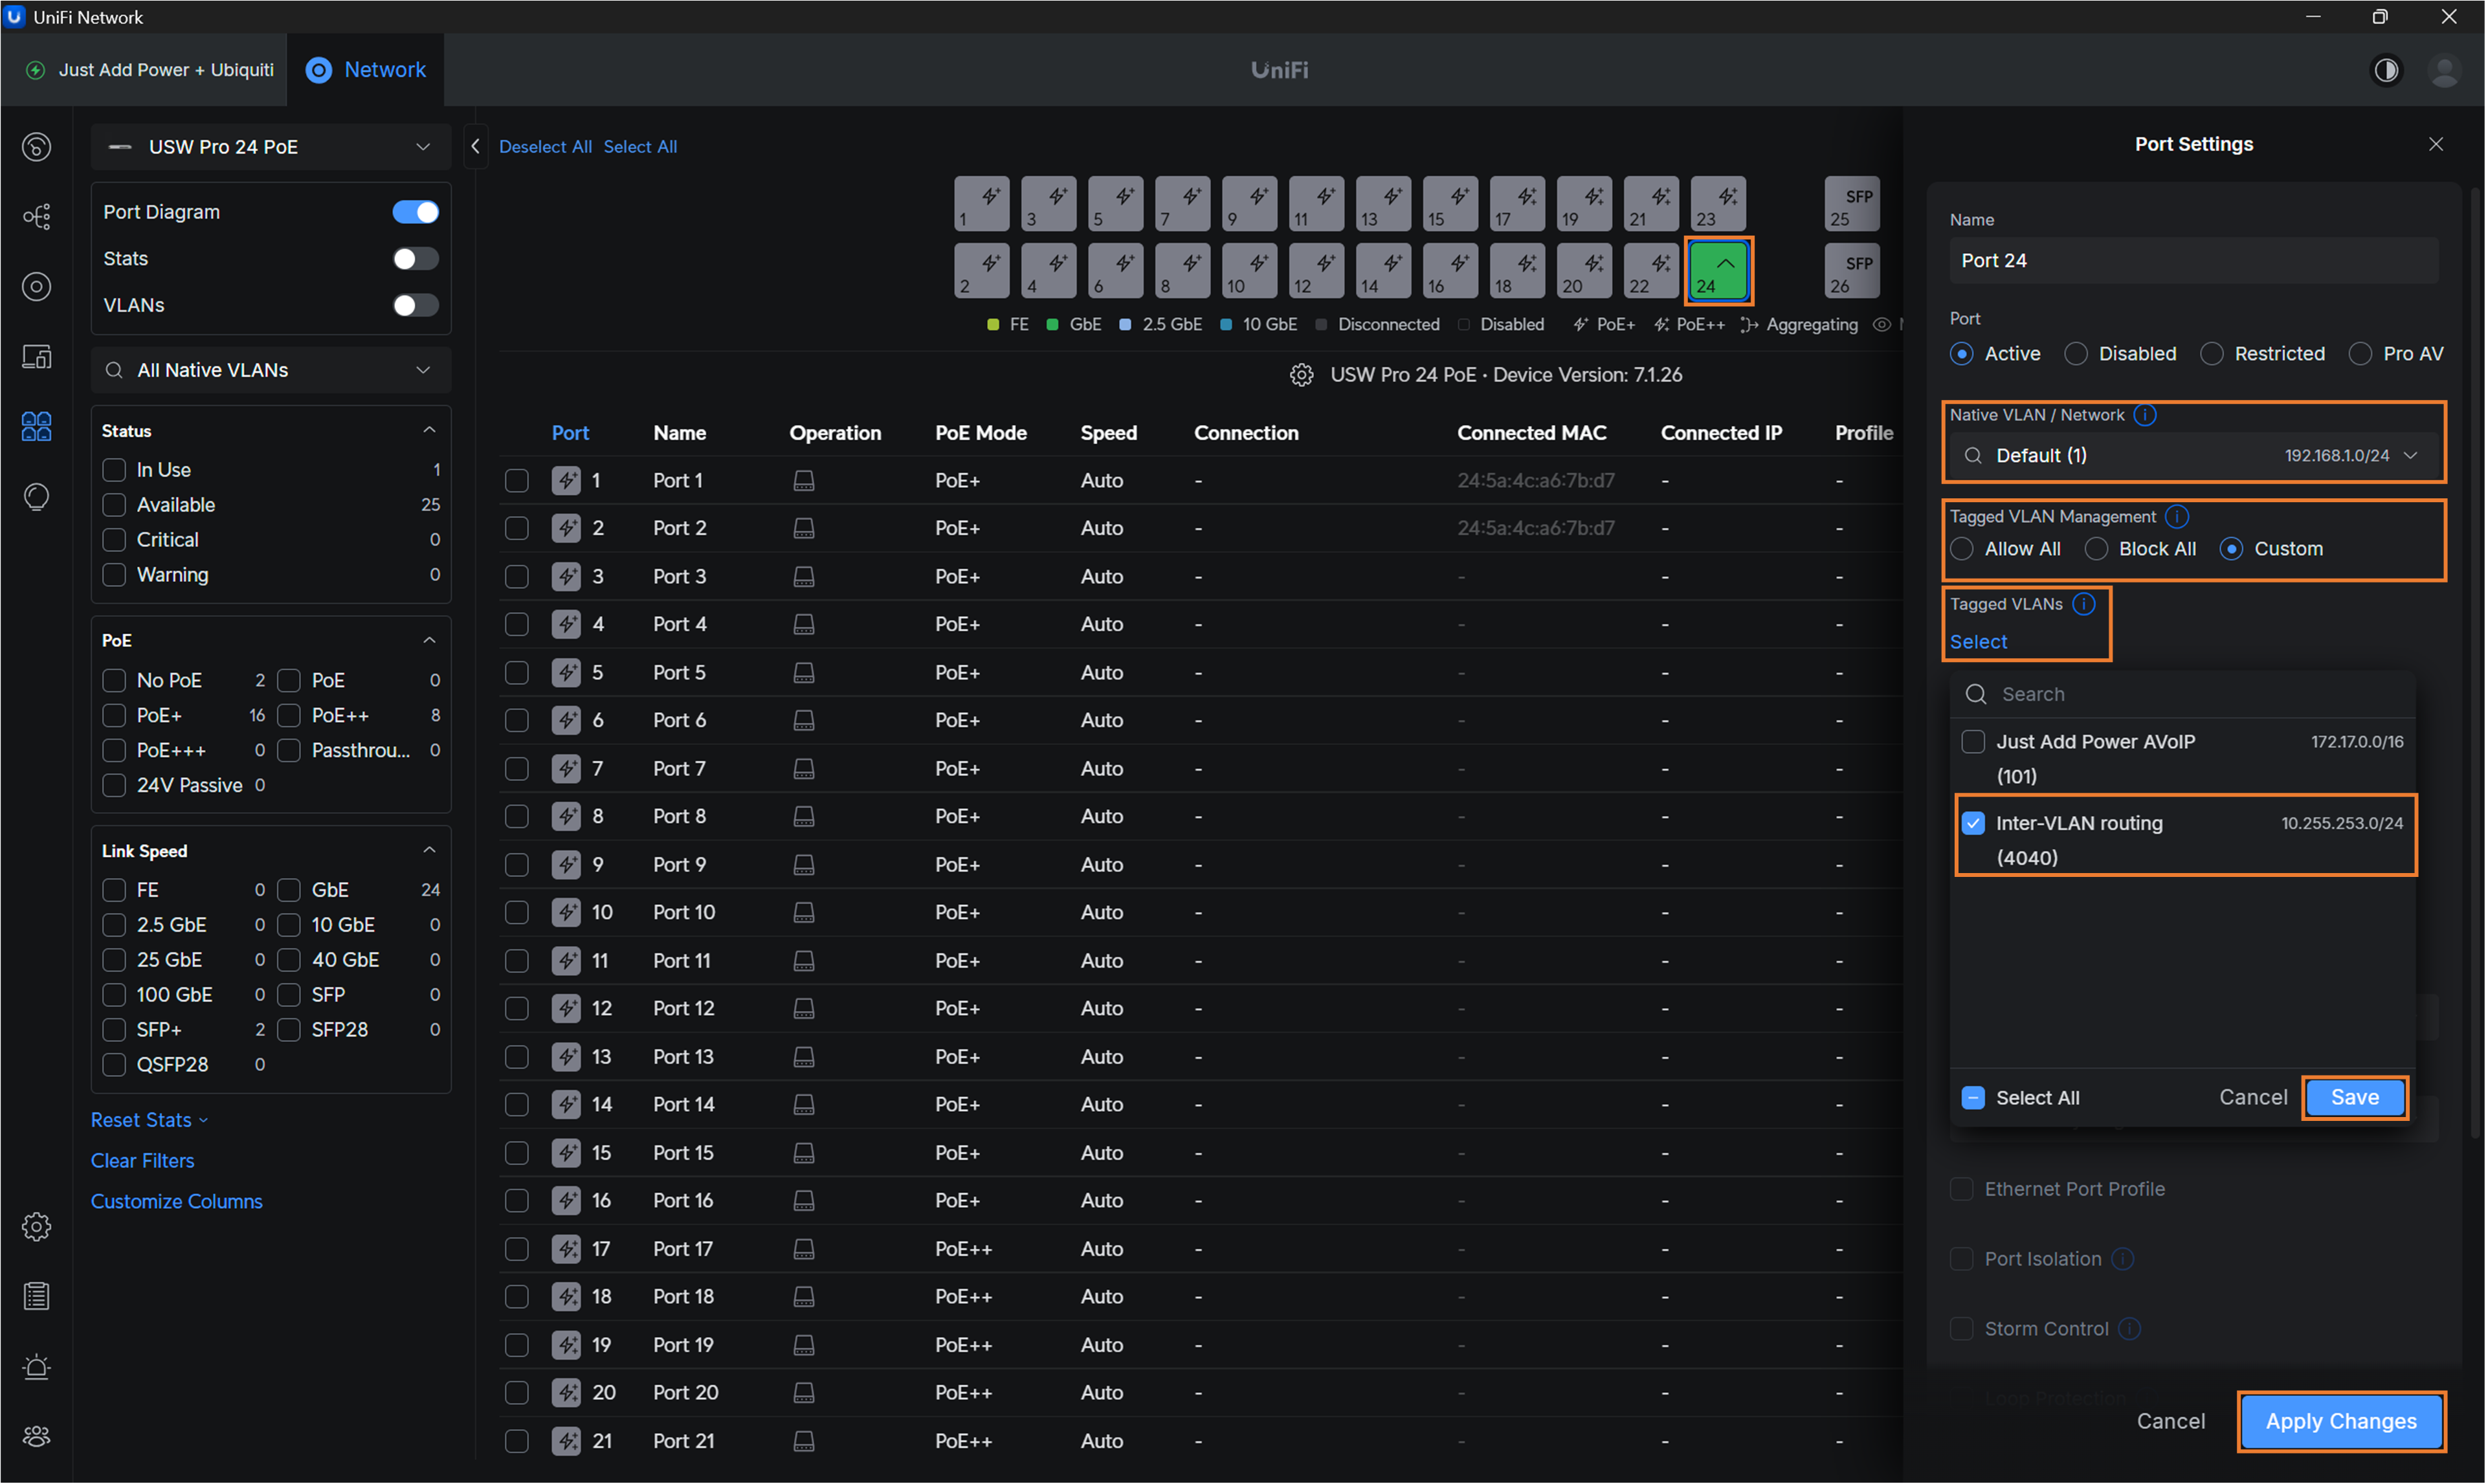
The last step is to block the Just Add Power AVoIP VLAN from the uplink port (so AV traffic does not flood the rest of the network).
-
On the central diagram, select the Uplink Port of the switch. (In this Example, It is Port 24)
-
Set Native VLAN/Network to Default VLAN 1.
-
Set Tagged VLAN Management to Custom.
-
Select Tagged VLANsand check the box for Inter-VLAN routing (4040).
-
Click Save.
-
Click Apply Changes.
-
-
Switch Configuration is Done!
-
Repeat Part 2 for any Additional Switches that will use Just Add Power.
-
Continue with Part 3 for additional setup instructions for systems that include more than one switch.
-
Part 3: Setup Multicast Router Ports
Note: Steps below are required for Just Add Power systems with more than one Ubiquiti switch. Skip to Part 4 if using Just Add Power on a single switch.
-
Open Unifi OS Server 4.6.3.1 (or Dream Machine equivalent). All configuration is applied through this interface.
-
Follow the steps outlined in Part 2 for every Ubiquiti switch in the system with Just Add Power Devices.
-
-
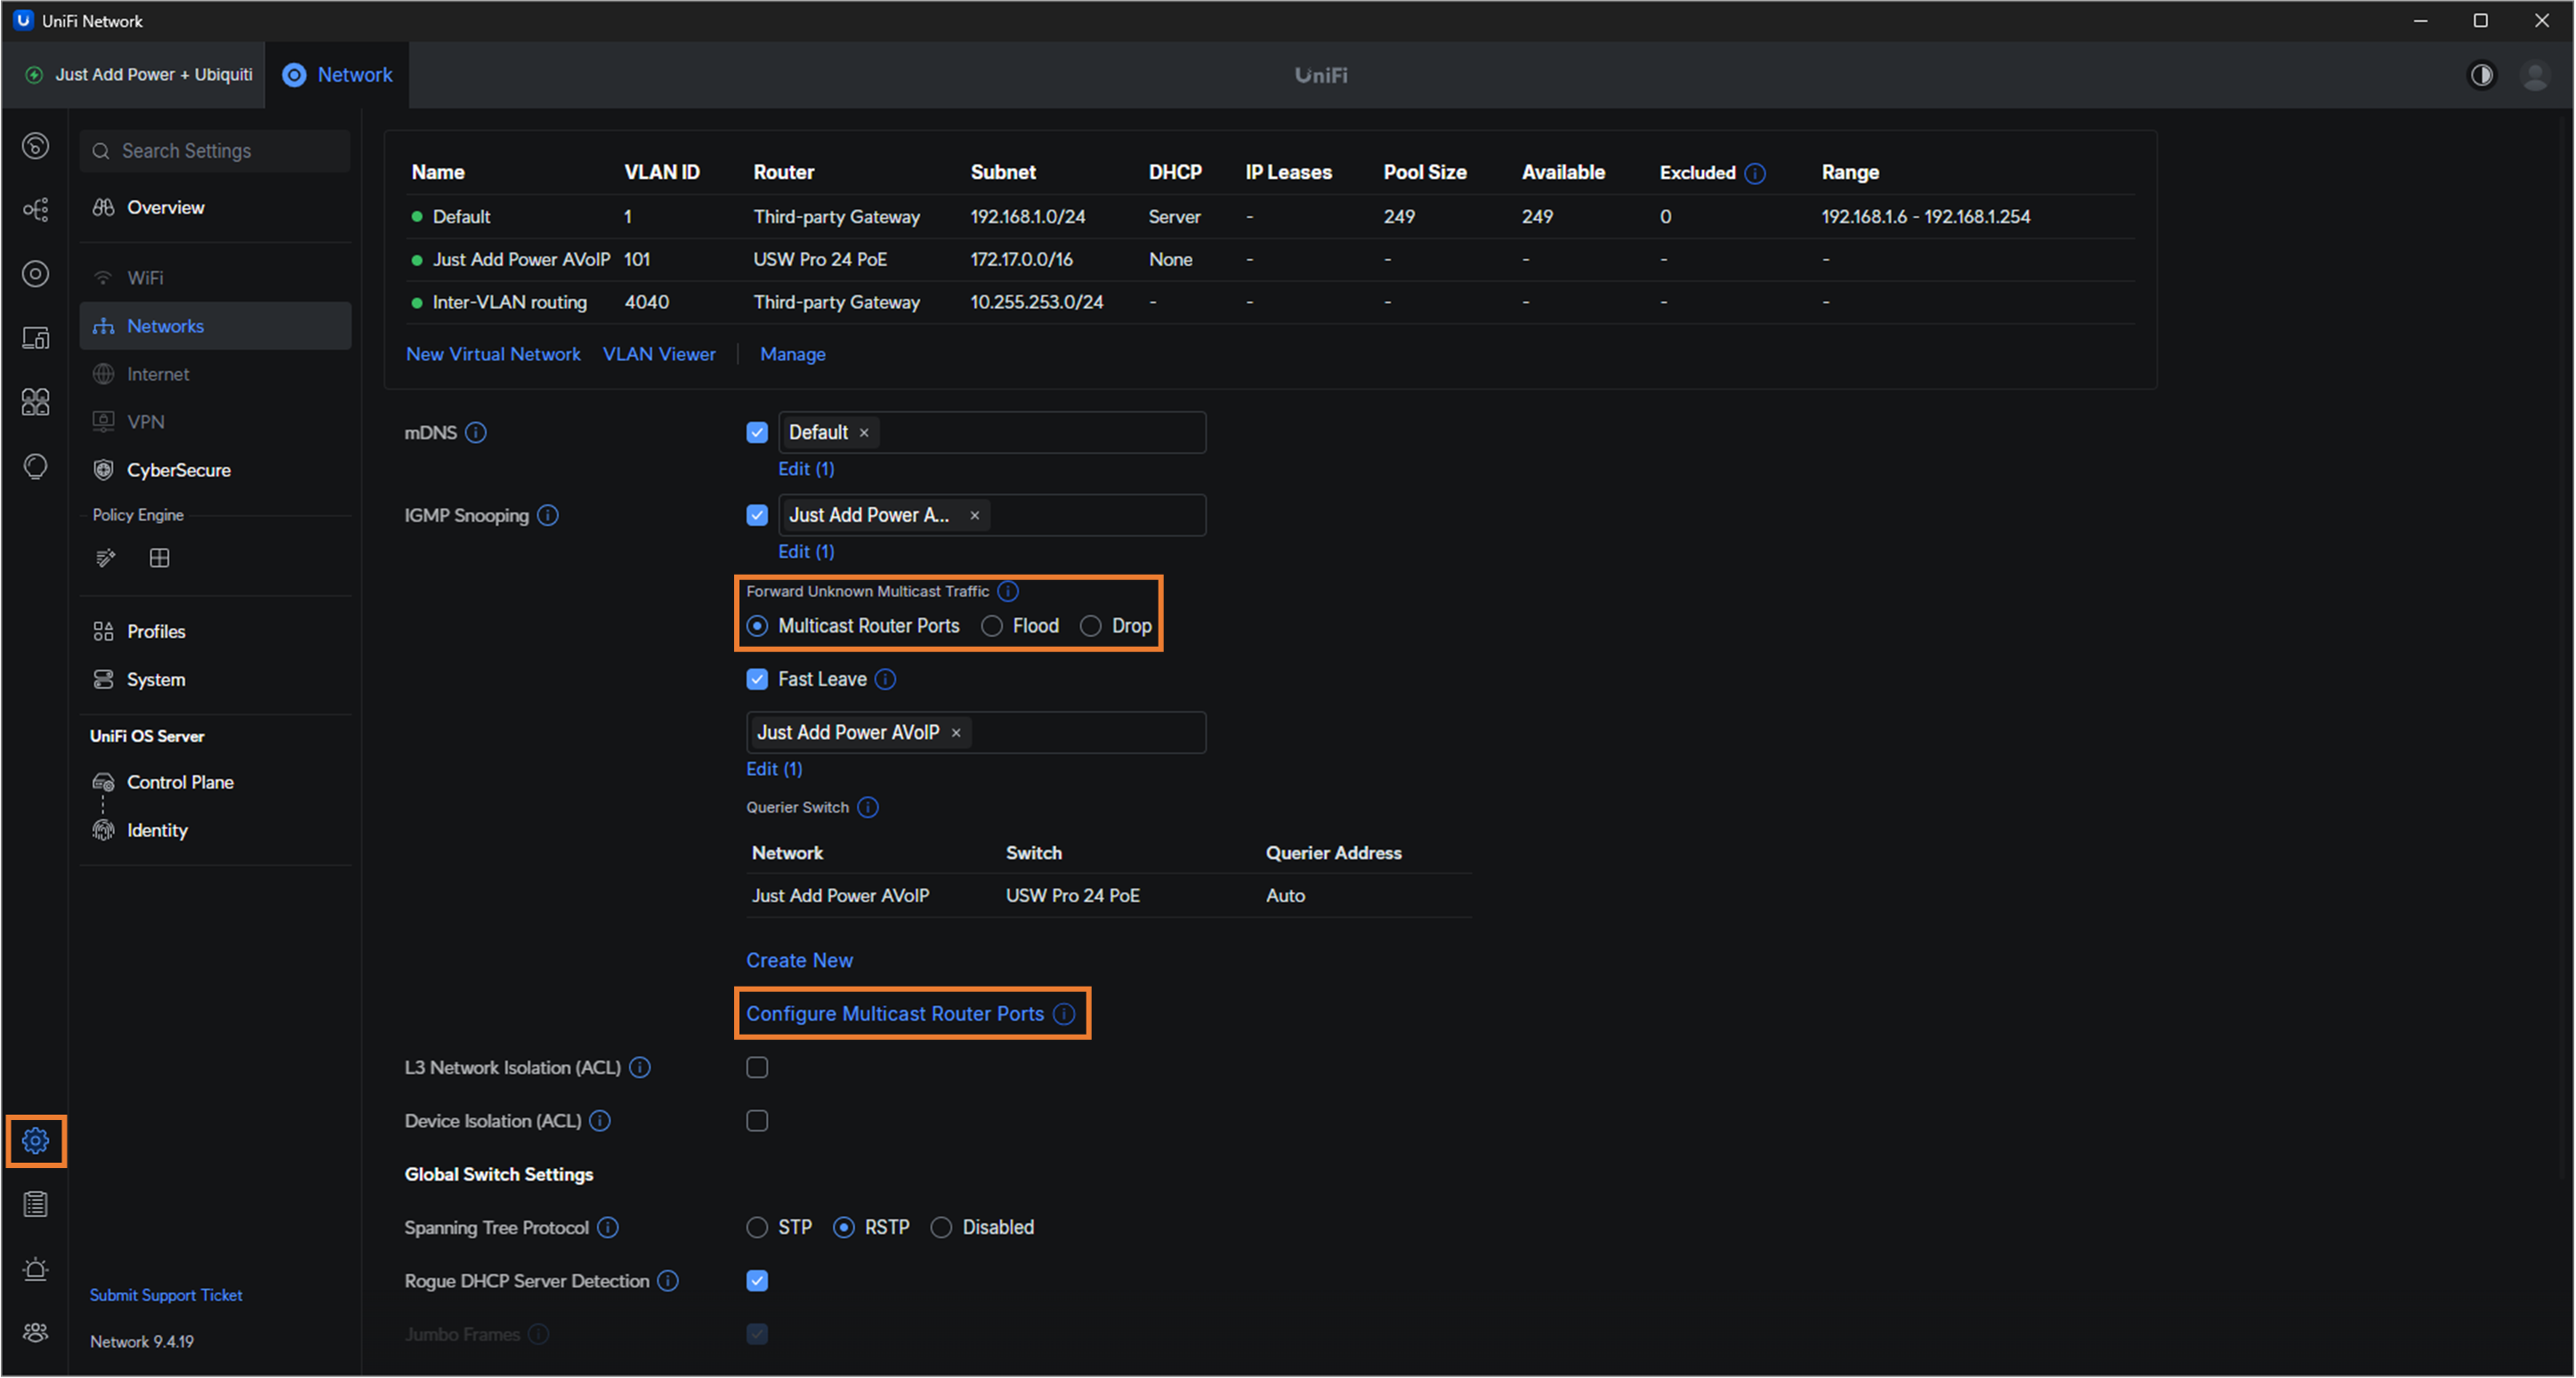
On the left tab, select Settings --> Networks
-
Select Multicast Router Ports for the Forward Unknown Multicast Traffic setting.
-
Click on Configure Multicast Router Ports.
-
This should have navigated you to the Ports section of the UI.
-
In the upper left, select any Non-Querier Switch in your network that will have Just Add Power Devices. For this example, it will be the USW-Pro-24.
-
Select the SFP Port that'll connect to the Querier Switch.
-
Check Multicast Router Port.
-
Click Select Networks.
-
Check Just Add Power AVoIP (101).
-
Click Save.
-
Click Apply Changes.

-
-
Done!
Continue the steps in Part 4 for configuring Just Add Power Devices.
Part 4: Use AMP Alternate Configuration
To configure Just Add Power devices:
-
Connect Just Add Power devices to VLAN 101 ports
-
Connect the PC running AMP to a VLAN 101 port
-
Run AMP Alternate
To control the Just Add Power system:
-
Connect the control system to VLAN 1 (data VLAN). That's it!

