



Overview
CEC (Consumer Electronics Control) is an HDMI feature that allows devices to send control commands over the HDMI cable. In a simple point-to-point setup, this allows a TV remote to control a connected source device.
CEC works well when a single source is connected directly to a single display. In an HDMI over IP system, however, a single source may be routed to multiple displays simultaneously. Allowing native HDMI CEC to pass through the system could unintentionally send commands to multiple displays or sources at once.
To prevent this, Just Add Power devices isolate native HDMI CEC communication and instead allow CEC commands to be intentionally passed to a specific Encoder or Decoder.
CEC over IP
In a Just Add Power system, the physical CEC link between the source and display is interrupted at the Encoder and Decoder.
- CEC commands from a source stop at the Encoder.
- CEC commands from a display stop at the Decoder.
CEC is then treated similarly to IR over IP or Serial over IP. A control system sends a CEC command to a specific Just Add Power device, which then forwards the command to the connected source or display.
This ensures CEC commands are delivered only to the intended zone, providing predictable behavior in distributed AV systems.
Note: Native HDMI CEC does not pass directly through a Just Add Power system. All CEC commands must be intentionally forwarded to the appropriate Encoder or Decoder.
Default CEC Settings
CEC is configured independently on each Just Add Power device. The default setting depends on whether the device is operating as an Encoder or Decoder.
| Device | Default | Recommendation |
|---|---|---|
| Encoder | Disabled | Enable CEC only when it will be used to control the connected source. |
| Decoder | Enabled | Leave CEC enabled only in zones where it will be used to control the connected display or AVR. |
Best Practice: Disable CEC on each Encoder or Decoder where it is not being used. Review this setting on a per-zone basis so that only the devices intended to provide CEC control have it enabled.
webUI
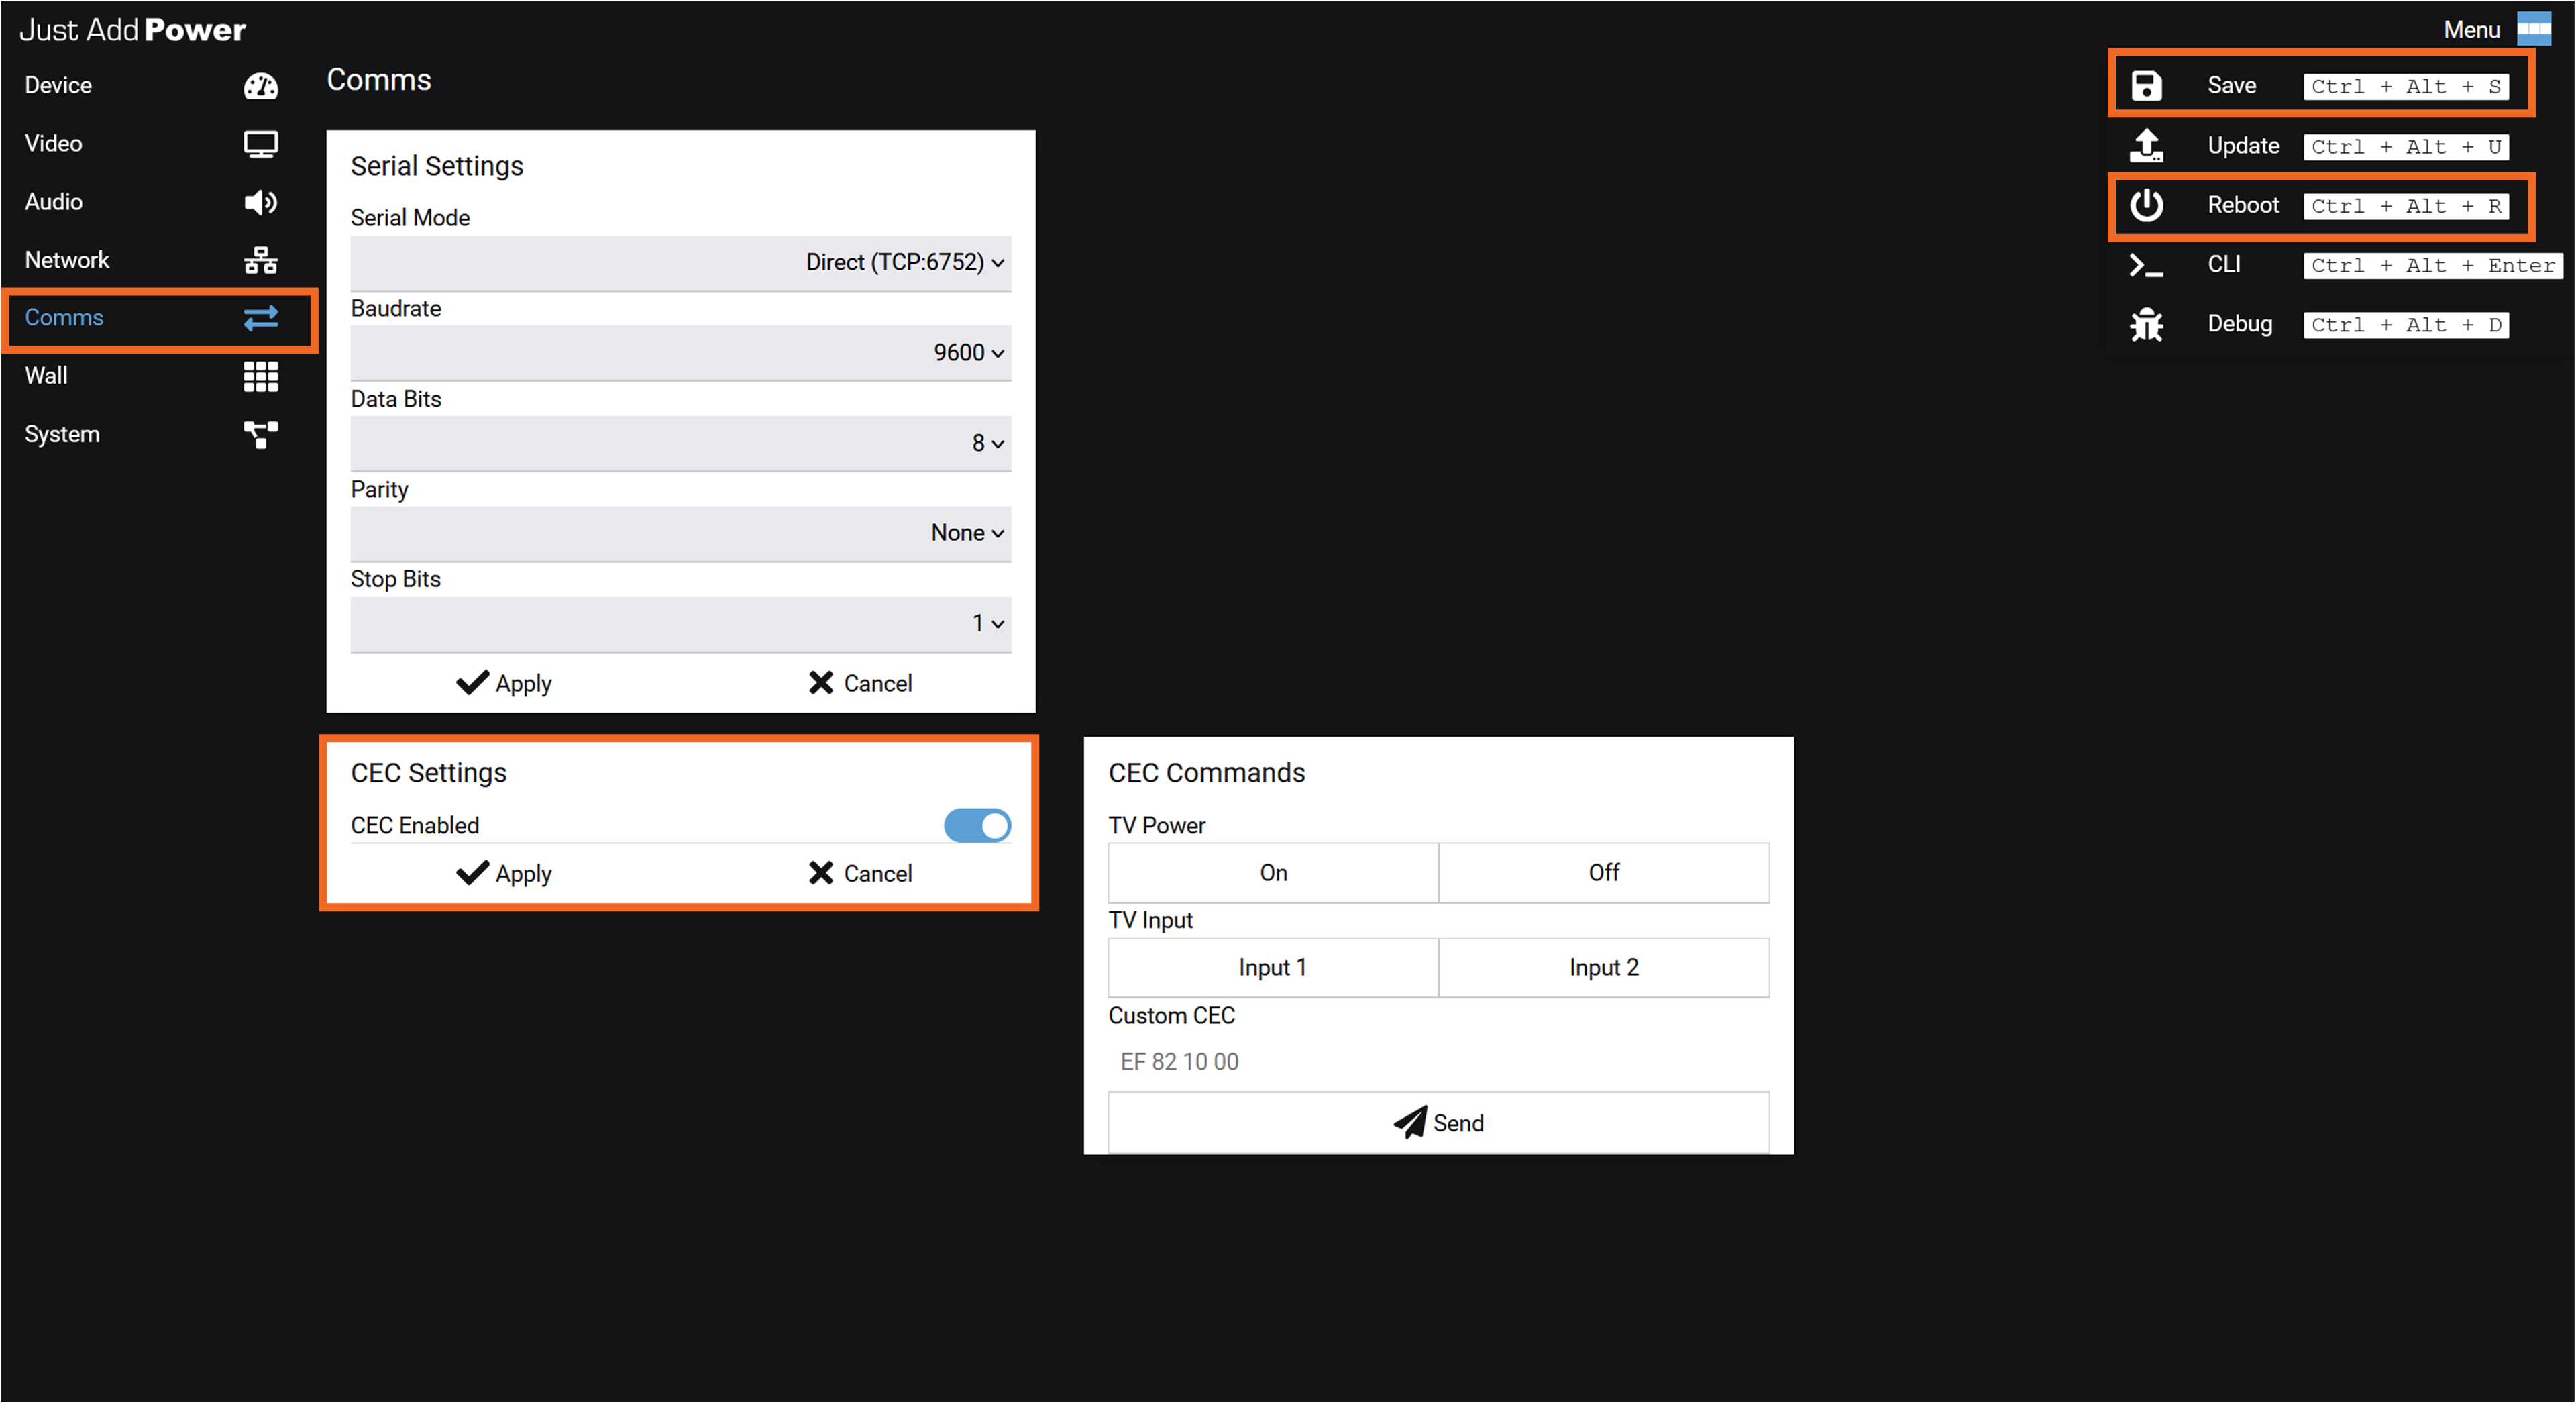
The device webUI provides access to the CEC configuration and allows CEC commands to be sent directly for setup and testing. Open the Comms page to access the CEC Settings and CEC Commands cards. For instructions on opening the webUI, see How to Access a Device.
CEC Settings
Use the CEC Enabled switch in the CEC Settings card to enable or disable CEC on the device being accessed, then select Apply > Save > Reboot to save the setting.
- Enable CEC when the device will send commands to its connected HDMI endpoint.
- Disable CEC when CEC control is not required for that source or zone.
- The setting applies only to the Encoder or Decoder whose webUI is open. Repeat the procedure for each device that requires a different setting.
CEC Commands
Use the CEC Commands card to send a command directly from the webUI to the source, display, or AVR connected to that Just Add Power device. This is useful for confirming that the endpoint responds to CEC before programming the control system.
- TV Power: Select On or Off to send a built-in display power command.
- TV Input: Select Input 1 or Input 2 to send the corresponding built-in HDMI input command.
- Custom CEC: Enter a supported hexadecimal CEC command and select Send.
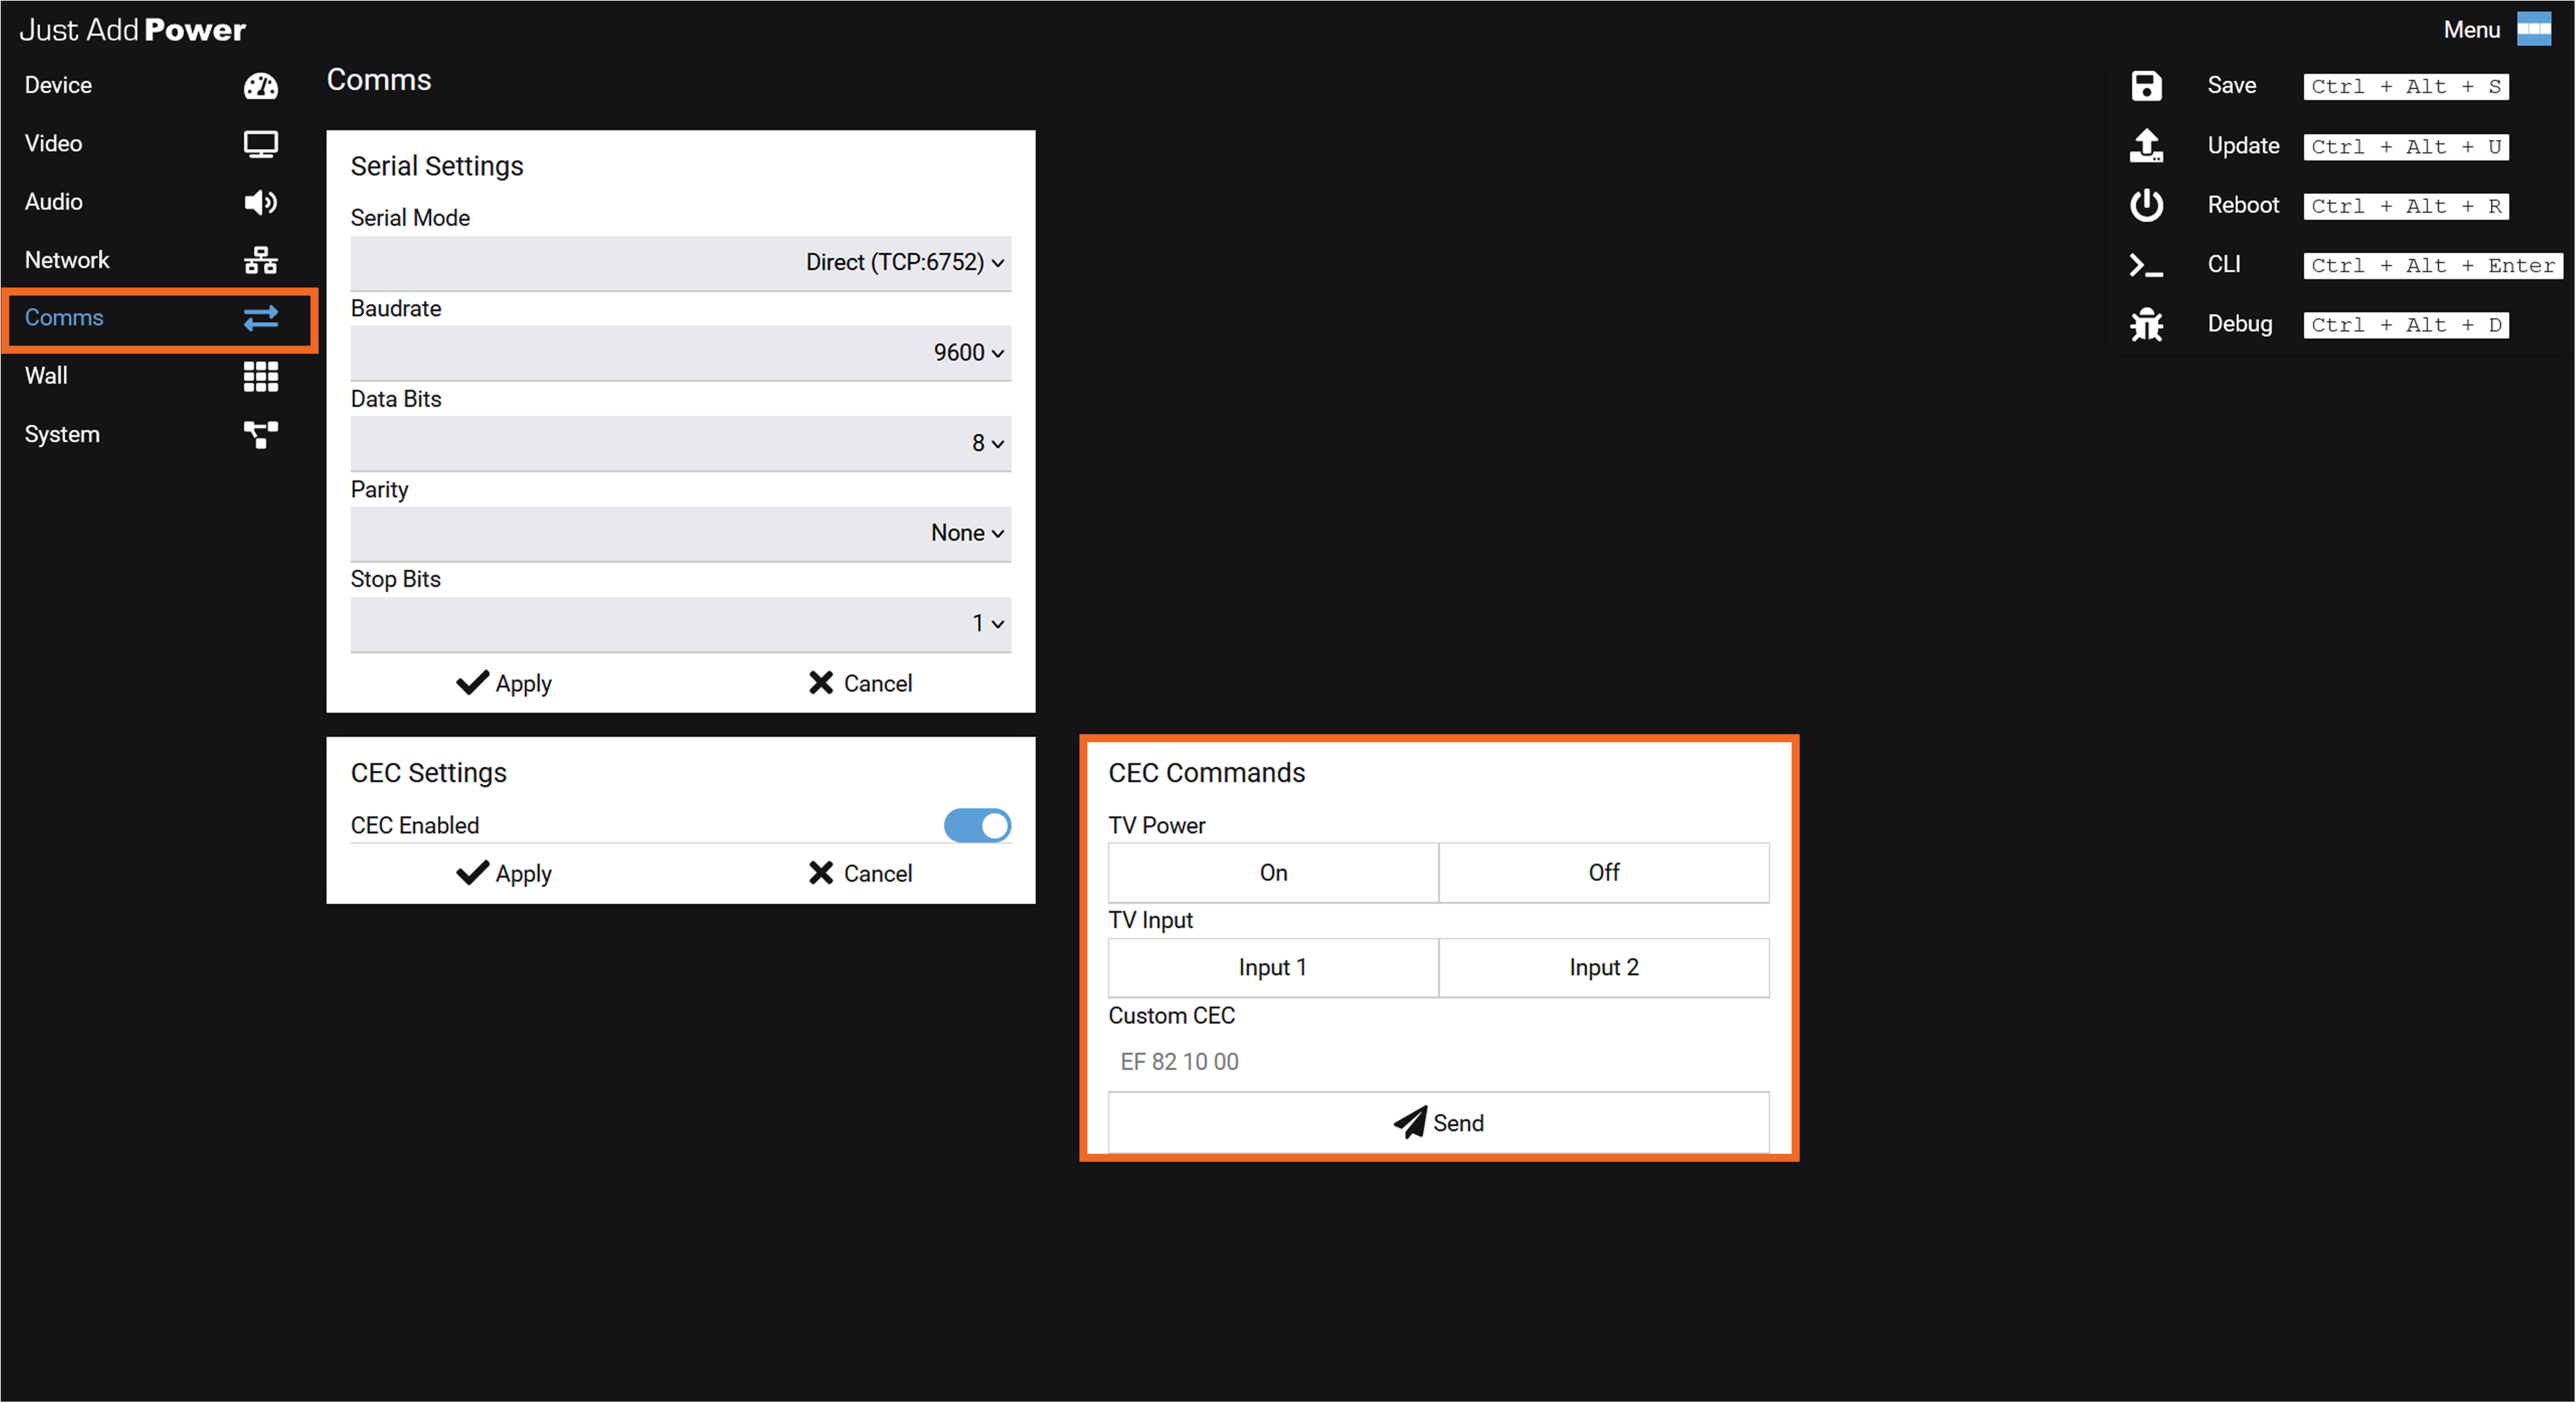
Each command is executed once. Sending a command from this card does not change the CEC setting or create an automated control action.
Before Sending a Command: Confirm that the webUI belongs to the intended Encoder or Decoder and that CEC is enabled on that device.
CLI and HTTP API Access
For control system integration, CEC commands can also be sent using either the Command Line Interface (CLI) through Telnet or the HTTP API.
All commands are case-sensitive.
Built-In Commands
The following CEC commands are built into Just Add Power devices and are supported in standard drivers:
| Function | CLI Command | API Command | Notes |
|---|---|---|---|
| Power On | |
|
Works on most displays |
| Power Off | |
|
Works on most displays |
| Select HDMI 1 | |
|
Works on most displays and AVRs |
| Audio Mute | |
|
Primarily for AVR HDMI outputs |
| Audio Un-mute | |
|
Primarily for AVR HDMI outputs |
Firmware Requirements
The cec_mode options described in this article require the following minimum firmware versions:
- Omega Series / Ultra Series: justOS B3.2.0 or later
- MaxColor Series: MAX v4.5.0 or later
CEC Mode Behavior Modification (cec_mode)
A configurable parameter called cec_mode changes how certain built-in CEC commands are handled by the device.
Depending on the selected option, cec_mode can add an input selection command before or after a power command, or change how CEC button press and release commands are transmitted.
These options are useful for displays or AVRs that require additional CEC behavior beyond a standard power command.
Available Options
Multiple options may be applied simultaneously. When more than one is set, all selected behaviors will execute.
| Option | Behavior |
|---|---|
|
Sends cec_watch_me.sh BEFORE cec_tv_on.sh |
|
Sends cec_watch_me.sh AFTER cec_tv_on.sh |
|
Sends cec_watch_me.sh BEFORE cec_tv_off.sh |
|
Sends separate CEC commands for button press and button release, then delays subsequent commands for 2 seconds. |
Applying the Setting
Warning: Do not combine the wake_on, wake_off, or watch_on options with extra.
Use the following syntax in the CLI:
Apply one option:
astparam s cec_mode wake_on
Apply two options:
astparam s cec_mode wake_on wake_off
Apply all options:
astparam s cec_mode wake_on wake_off watch_on
Apply Press & Release option:
astparam s cec_mode extra
Save Settings to Memory
astparam save
Reboot the Device
After saving the configuration, reboot the device for the changes to take effect.
reboot
Custom Commands
Note: Manufacturer support for CEC varies. Even standardized CEC commands may behave differently depending on the connected device. Always verify custom commands before deployment.
If the hexadecimal command sequence is known, any valid CEC command can be transmitted through a Just Add Power device.
Format
CEC commands consist of hexadecimal byte pairs.
The first byte specifies the source and destination logical addresses, while the remaining bytes contain the CEC opcode and any required parameters.
Example:
EF 82 10 00
To send a custom command:
CEC_SEND_BYTES EF 82 10 00
Finding CEC Codes
Because CEC is part of the HDMI specification, many codes are standardized. However, manufacturer implementation varies. Always test commands before deployment.
A commonly used CEC lookup tool is:
CEC-O-Matic is published and maintained by INCYMA. All credit for that tool belongs to its respective owners.
Common Custom Codes
Begin all entries below with CEC_SEND_BYTES
| Function | Code | Notes |
|---|---|---|
| Power On | E0 04 |
Works on most displays |
| Power Off | E0 36 |
Works on most displays |
| Select HDMI 1 | EF 82 10 00 |
Works on most displays and AVRs |
| Select HDMI 2 | EF 82 20 00 |
Works on most displays and AVRs |
| Select HDMI 3 | EF 82 30 00 |
Works on most displays and AVRs |
| Toggle Mute | E0 44 43 |
Device-dependent |
| Volume Up | E0 44 41 |
Device-dependent |
| Volume Down | E0 44 42 |
Device-dependent |

